
Sample Exercise: Creating One A2J Guided Interview with Multiple Templates
This Sample Exercise will teach you how to create an A2J Guided Interview with three separate templates using the A2J Author Document Assembly Tool (A2J DAT). These templates will conditionally assemble based on the user’s selection in the interview.
The final document assembly project will include the following three PDF templates:
The Judgment for Dissolution of Marriage: You can find the document here.

The Order of Support: You can find the document here.

Non-Marital Property Form: You can find the document here.

This Sample Exercise should be used by authors who have completed a basic A2J Author training. Training videos can be found on our A2J Author YouTube Channel. (www.youtube.com/a2jauthor)
A2J DAT PDF Template # 1
We’ll first focus on the A2J DAT PDF Templates, then move on to creating the A2J Guided Interview.
-
Log into your www.a2jauthor.org account. If you aren’t sure how to create an account, check out this resource.
-
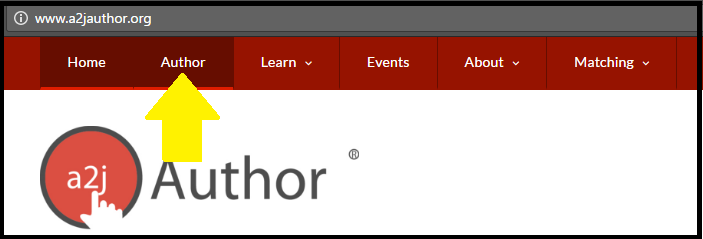
Once logged in, go to the “Author” tab and click it.
-
Then click “Run A2J Author”.
-
A2J Author will open on the “Interviews” Tab. Under “Create a new interview” double click on “Blank Interview.” This will open up a blank A2J Guided Interview. To learn more about authoring in A2J Author 6.0, check out our Authoring Guide.
-
Go to the About tab and change the title of your interview to Sample Exercise: Multiple Templates. You can select any of the guide avatar options to customize the Guide avatar. You should also click over to the Author tab inside the About tab in order to add your information as the author of this interview.
-
Go to the Templates tab. Click the “Create PDF Template” button in the top right hand corner. It will take you into the PDF Template tool.
-
The PDF Template tool lets you automate on top of an existing PDF document and maintain the existing formatting of that PDF. When you open the PDF Template Tool it will look like this:
-
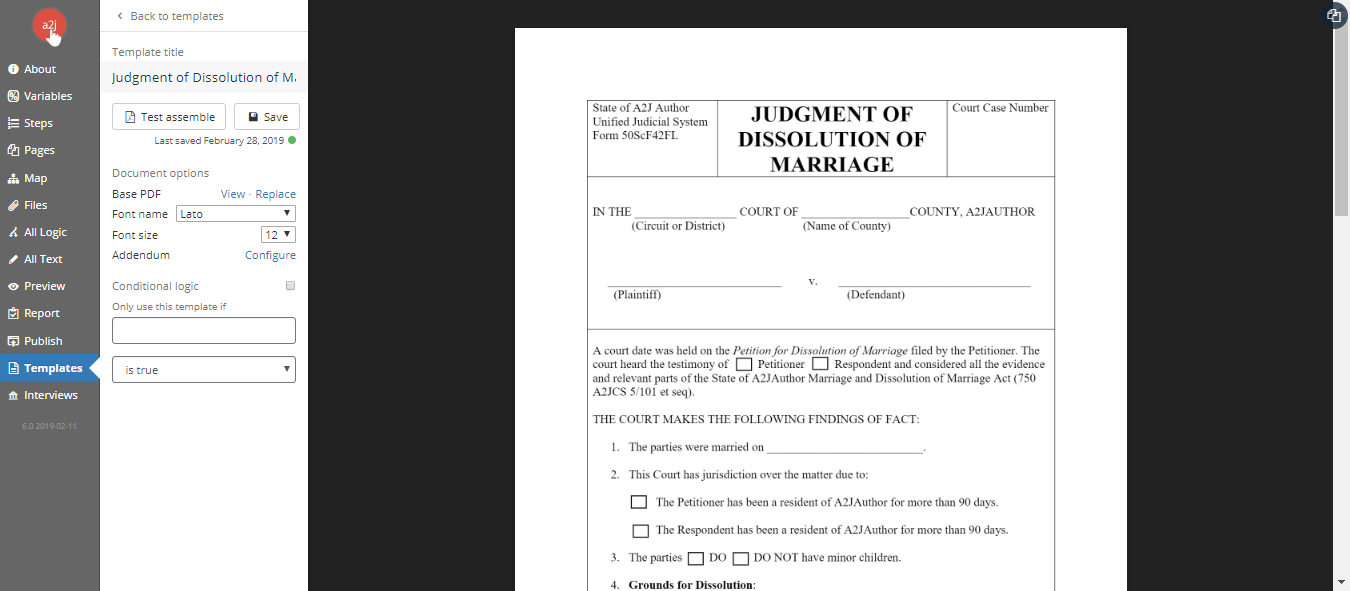
Name your template. In the “Untitled Template” field in the left editing panel, delete “Untitled Template” and type in “Judgment of Dissolution of Marriage”. Hit the Save button underneath it. Your template is automatically saved every 5 minutes, but it doesn’t hurt to hit the “Save” button every so often, particularly after making several changes.
-
Your last saved information will appear underneath the save button.


-
Now we need to add the underlying PDF to the PDF Template Tool. Click the “Upload PDF” button in the center of the blank editing field.

This will open your computer’s local file search tool.

-
Navigate to where you saved the PDF that we’ll automate in this Sample Exercise. (It’s here if you need to download it.) Select that file and click “Open”. A2J Author will convert the PDF to a PDF Template. It should look like this:
-
Now we’re going to start automating the template by inserting variables in all the blank spaces. This is all the information that the end user will need to complete the sample exercise document. To insert a variable field (a blank space on the template that will contain a variable), double click on the blank line. The first one we’re going to do is “Circuit Name” on the first line. We will use the variable named Circuit name TE. See the gif.

If you need to adjust the size of the variable field, you can do so by dragging the corners of the field to make the box taller, shorter, wider, or narrower. You can also manually draw fields by holding down the left click button on your mousepad and dragging the cursor to draw the box. If you need to adjust the placement of the field, you can click on it and drag it. To add a variable to the field that you just created, right click on the yellow “unassigned variable” variable field. An “Assign variable” editor will pop up. Type the name of the variable into the editor and select the variable type. If it is a repeating variable (*a type of variable meant to hold multiple values for a repeat loop) check the “Check if multiple values” box. You can also add comments about this variable that can only be seen by authors. The “Text grouping” “Text overflow” and “Addendum label” selections can be ignored unless you want to group multiple fields together (to be used for a series of checkboxes or multiline text).
-
Create a text type variable with the name: Circuit name TE (see the gif above)
-
Create fields and assign variables for the following:
-
County TE
-
Type = text
-
-
Petitioner name full TE
-
Type = text
-
-
Respondent name full TE
-
Type = text
-
-
Petitioner testified TF
-
Type = true/false
-
-
Respondent testified TF
-
Type= true/false
-
-
Marriage date DA
-
Type = date
-
-
Petitioner is resident TF
-
Type = true/false
-
-
Respondent is resident TF
-
Type = true/false
-
-
Have children TF
-
Type = true/false
-
Draw 2 boxes and add the same variable to the DO and DO NOT boxes. For the DO NOT box, check the box that says “If the variable is false, draw the checkmark.”
-
-
Marital property value NU
-
Type = number
-
-
Marital property percentage to petitioner NU
-
Type = number
-
-
Marital property percentage to respondent NU
-
Type = number
-
-
Have nonmarital property TF
-
Type = true/false
-
Draw 2 boxes and add the same variable to the DO and DO NOT boxes. For the DO NOT box, check the box that says “If the variable is false, draw the checkmark.”
-
-
Attached nonmarital prop form TF
-
Type = true/false
-
-
Order for support TF
-
Type = true/false
-
-
Debt split evenly TF
-
Type = true/false
-
Draw 2 boxes and add the same variable to the box “Each party will be responsible for 50% of each joint debt” and “The parties will divide the debts as follows”. For the “The parties will divide the debts as follows” box, check the box that says “If the variable is false, draw the checkmark.”
-
-
Respondent debt percentage NU
-
Type = number
-
-
Petitioner debt percentage NU
-
Type = number
-
-
-
Congratulations! Your 1st A2J PDF Template is now fully automated. It should look like this:


A2J DAT PDF Template #2
-
Go back out to the Templates Tab. The second form that we are going to automate is the Order of Support. Click “Create PDF Template”
to make a new blank PDF Template.
-
Name your template. In the “Untitled Template” field in the left editing panel, delete “Untitled Template” and type in “Order of Support”. Hit the Save button underneath it.
-
Upload the base PDF now. You can find the Order of Support underlying PDF here. It should look like this when uploaded:
-
This template is only going to be inserted in the end user’s completed document assembly package if they need the Order of Support. That is, if Order of support TF is true. We need to set this template to be conditionally inserted. Check the box next to “Conditional logic”. Then add the variable Order of support TF to the box under “Only use this template if”. Make sure “is true” is still showing. See the gif.
c
-
Now let’s automate the template. Create fields for all of the blank spaces and add the following variables. Some of these are repeated from the Judgment of Dissolution of Marriage Template, so they can be reused instead of created new.
-
Circuit name TE
-
Type = text
-
-
County TE
-
Type = text
-
-
Petitioner name full TE
-
Type = text
-
-
Respondent name full TE
-
Type = text
-
-
Support amount NU
-
Type = number
-
-
Support paid per MC
-
Type = multiple choice
-
Make sure the radio button in front of “Pass multiple choice value” is selected. This allows the word (in this case “weekly”, “monthly”, “yearly”) to be passed into the field, not just a checkmark.
-
-
Within guidelines TF
-
Type = true/false
-
Draw 2 boxes and add the same variable to the “within guidelines” option and “not within guidelines” option. For the “not within guidelines” box, make sure to check the box that says “If the variable is false, draw the checkmark.”
-
-
Order of support start date DA
-
Type = date
-
-
-
Your second template is now fully automated. This is what it should look like:


A2J DAT PDF Template #3
- Go back out to the Templates Tab. The third and final form that we are going to automate is the Non-Marital Property Form. Click “Create PDF Template”
-
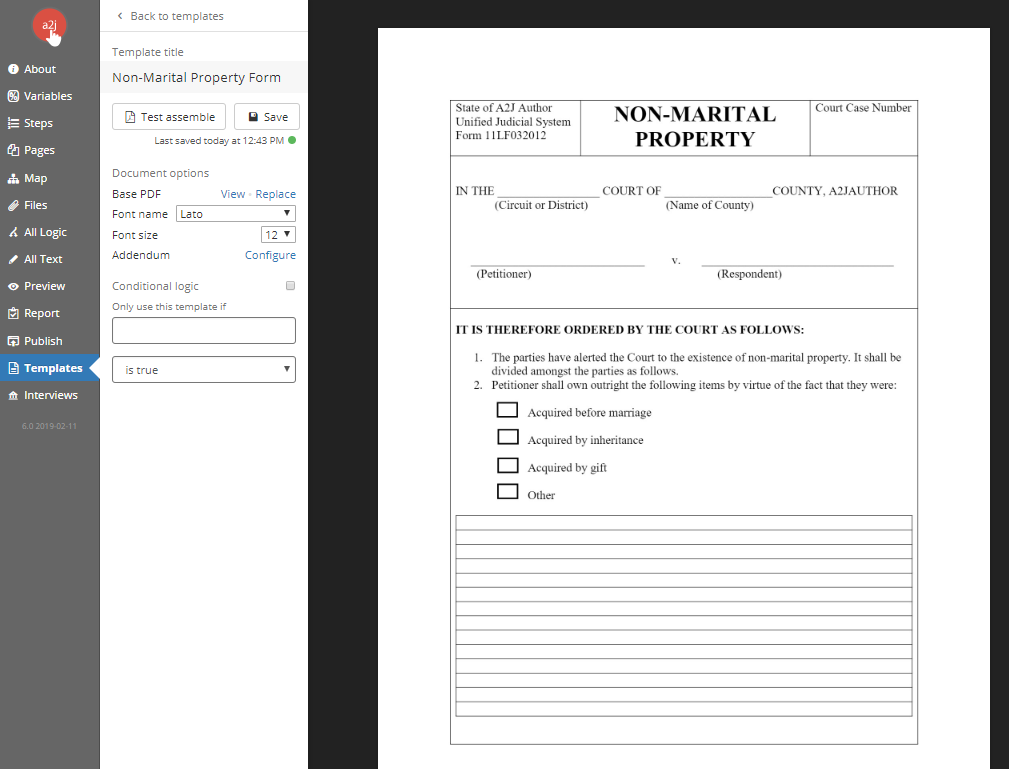
Name your template. In the “Untitled Template” field in the left editing panel, delete “Untitled Template” and type in “Non-Marital Property Form”. Hit the Save button underneath it.
-
Upload the base PDF now. You can find the Non-Marital Property Form underlying PDF here. It should look like this when uploaded:
-
This template is only going to be inserted in the end user’s completed document assembly package if they have non-marital property and need to report it using the Non-Marital Property Form. That is, Attached nonmarital prop form TF if is true. We need to set this template to be conditionally inserted. Check the box next to “Conditional logic”. Then add the variable Attached nonmarital prop form TF to the box under “Only use this template if”. Make sure “is true” is still showing

-
Now let’s automate the template. Create fields for all of the blank spaces and add the following variables. Some of these are repeated from the Judgment of Dissolution of Marriage Template and Order of Support, so they can be reused instead of created new.
-
Circuit name TE
-
Type = text
-
-
County TE
-
Type = text
-
-
Petitioner name full TE
-
Type = text
-
-
Respondent name full TE
-
Type = text
-
-
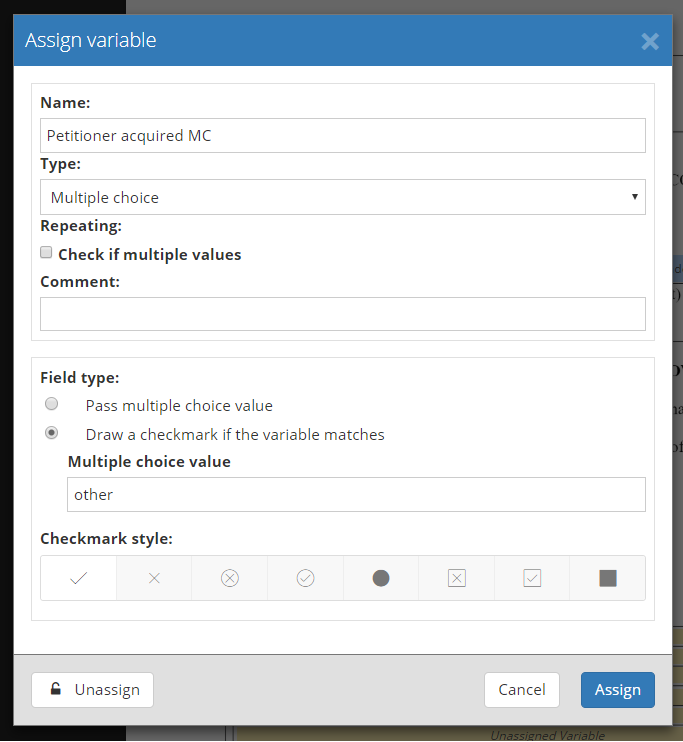
Petitioner acquired MC
-
Type = multiple choice
-
This same variable will be used for all 4 boxes related to the Petitioner’s ownership of the nonmarital property.
-
Make sure the radio button in front of “Draw a checkmark if the variable matches” is selected
-
For box 1 (next to “Acquired before marriage”) add the value: before
-
For box 2 (next to “Acquired by inheritance”) add the value: inheritance
-
For box 3 (next to “Acquired by gift”) add the value: gift
-
For box 4 (next to “Other) add the value: other. Here’s an example of the Other field.
-
-
Petitioner nonmarital property TE
-
Type = text
-
This same variable will need to be added to all of the blank lines under paragraph #2.
-
Select the 1st unassigned variable field, then hold down the control key and select all of the fields in that paragraph. Right click to open the variable editor. Check the “Check if multiple values” box. This will link all the fields in this paragraph together and allow for overflow from one field to the next if the user’s answer exceeds the character limit of that line.
-
-

-
-
Respondent acquired MC
-
Type = multiple choice
-
This same variable will be used for all 4 boxes related to the Petitioner’s ownership of the nonmarital property.
-
Make sure the radio button in front of “Draw a checkmark if the variable matches” is selected
-
For box 1 (next to “Acquired before marriage”) add the value: before
-
For box 2 (next to “Acquired by inheritance”) add the value: inheritance
-
For box 3 (next to “Acquired by gift”) add the value: gift
-
For box 4 (next to “Other) add the value: other
-
-
Respondent nonmarital property TE
-
Type = text
-
This same variable will need to be added to all of the blank lines under paragraph #3.
-
Select the 1st unassigned variable field, then hold down the control key and select all of the fields in that paragraph. Right click to open the variable editor. Check the “Check if multiple values” box. This will link all the fields in this paragraph together and allow for overflow from one field to the next if the user’s answer exceeds the character limit of that line.
-
-
-
Your third template is now fully automated. It should look like this:


A2J Guided Interview
Now it’s time to create the A2J Guided Interview that the end user will see.
-
Go to the Steps Tab. There are 4 steps in a blank A2J Guided Interview. We will need 1 more. We also need to change the name of the steps.
-
Add 1 additional step for a total of 5 from the drop down menu.
-
Change the name of the steps to:
-
Step (0): Introduction
-
Step (1): Case Basics
-
Step (2): Personal Information
-
Step (3): Dissolution Details
-
Step (4): The End
-
-
-
Go to the Pages Tab. A new A2J Guided Interview comes pre-populated with 4 questions. We are going to have 22 questions in our A2J Guided Interview. So you will need to create 18 additional questions.
-
Click the New Page button
at the top of the screen 18 times. Your screen should look like this:
-
-
Double click on the page 1-Introduction.
-
Scroll down to the text box. By default it says “This is the introduction.” Add “This A2J Guided Interview was created as part of the a sample exercise for multiple templates. It is not intended for use by the general public.” Close that page.
-
We’re going to connect all the questions at the very end, so don’t worry about that now.
-
-
Click on the page 2-Name.
-
Change the Step from 0 to 1.
-
Change the name to 1-Name (it is now the 1st question under Step 1, so the question numbering in the question name has to be updated. To learn more about question naming, check out this resource.)
-
We need to create a new variable to capture the user’s full name. We don’t yet know if the user is the Petitioner or the Respondent, so we need to capture the user’s name first, then sort them into Petitioner or Respondent next. Go to the Variables Tab.
-
Click the “Add” button at the top of the screen.
-
Name the variable User name full TE. It’s type should be text.
-
-
Go back to the Pages tab and re-open the newly named 1-Name
-
Scroll down to the Advanced Logic section and type the following into the After box:
-
-

IF HASANSWERED([Client middle name TE])
SET [User name full TE] TO [Client first name TE] + “ “ + [Client middle name TE] + “ “ + [Client last name TE]
ELSE
SET [User name full TE] TO [Client first name TE] + “ “ + [Client last name TE]
END IF
-
Close 1-Name and open 3-Gender.
-
Change the Step to Step 1.
-
Change the name to 2-Gender
-
This question sets the user’s avatar for them (Changes coming soon with additional avatars and ways to ask for avatar selection!!)
-
Close this question.
-
-
Open 1- Question 1
-
Change the name to 3-Other party name
-
Question text = What is the name of the other party?
-
Create 1 field.
-
Type = text
-
Label = Full name
-
Variable - we need to create one to store the other party’s name until we know whether the user is the petitioner or the respondent. Go to the Variables tab and create a new variable called Other party name full TE. The type should be text. Go back to the question 3-Other party name and add that variable to the field Full name.
-
-
Close this question
-
-
Open any of the “new page” questions
-
Change the Step to Step 1.
-
Change the name to 4-Petitioner or Respondent.
-
Question text = Are you the Petitioner or the Respondent.
-
At this point, you could add two pop ups. One would define Petitioner and one would define Respondent. You could also create a “Learn More” to give the end user information about how to select which party they are just at the point in which they need it. We’re going to create a Learn More. To learn more about Pop-Ups, check out this Sample Exercise.
-
Scroll to the “Learn More Prompt” field. This is the question the end user’s avatar has that prompts the “Help” from the guide avatar. In this field type: What if I don’t know?
-
Scroll to the “Help” field. Type: The Petitioner is the person who started the legal action. In this case, it would be the person who filed for divorce. The Respondent is the other party.
-
Scroll to the buttons section. Create 2 buttons (there is 1 by default, so add another one).
-
Button 1:
-
Label = Petitioner
-
Variable = Petitioner TF
-
Default value = true
-
Ignore destination for now.
-
-
Button 2:
-
Label = Respondent
-
Variable = Petitioner TF
-
Default value = false
-
-
-
Scroll to the Advanced Logic section. Here is where we will set the variables Petitioner name full TE and Respondent name full TE. Type this logic into the After logic box.
-
IF [Petitioner TF] = true
SET [Petitioner name full TE] TO [User name full TE]
SET [Respondent name full TE] TO [Other party name full TE]
ELSE
SET [Respondent name full TE] TO [User name full TE]
SET [Petitioner name full TE] TO [Other party name full TE]
END IF
-
Click on another “new page” page.
-
Move it to Step 1.
-
Rename it 5-Court and County
-
Question text = Is your case being heard in the Circuit or the District Court? In what county is the court located?
-
Scroll down to the fields section and create 3 fields.
-
Field 1
-
Type = radio button
-
Label = Circuit Court
-
Variable = Circuit name TE
-
Default value = Circuit
-
-
Field 2
-
Type = radio button
-
Label = District Court
-
Variable = Circuit name TE
-
Default value = District
-
-
Field 3
-
Type = Text (pick from list)
-
Label = County
-
Variable = County TE
-
Internal list (we’re making up a list of counties for the state of A2JAuthor) (make sure to hit “enter” or “return” after each county value =
-
-
-
Alabaster
Conner
Franklin
Highland
Jefferson
Lambert
Nottingham
Parker
Richards
Thomasville
Victor
Yantle
It should look like this in Preview mode if you’ve done it correctly:

-
Click on another “New page”
-
Change the step to Step 1.
-
Change the name to 6-Testified
-
Question text = Has the court heard testimony from the Petitioner, the Respondent, or both? Please select both checkboxes if both parties have testified before the court. Otherwise, just select one party.
-
Create 2 fields.
-
Field 1
-
Type = checkbox
-
Label = Petitioner
-
Variable = Petitioner testified TF
-
-
Field 2
-
Type = checkbox
-
Label = Respondent
-
Variable = Respondent testified TF
-
-
-
-
Click on another “New page”
-
Change it to Step 2
-
Change the name to 1-Marriage date
-
Question text = On what date were you and the other party married?
-
Create one field
-
Type = date
-
Label = nothing (the question only asks for 1 thing, so it should be clear to the end user what you’re looking for with this field)
-
Variable = Marriage date DA
-
-
-
Click on another “New page”
-
Change it to Step 2
-
Change the name to 2-Residency
-
Question text = Have both parties been residents of A2JAuthor for more than 90 days?
-
Create 2 fields
-
Field 1
-
Type = checkbox
-
Label = Petitioner has been a resident of A2JAuthor for more than 90 days.
-
Variable = Petitioner is resident TF
-
-
Field 2
-
Type = checkbox
-
Label = Resident has been a resident of A2JAuthor for more than 90 days.
-
Variable = Respondent is resident TF
-
-
-
-
Click on another “New page”
-
Change it to Step 2
-
Change the name to 3-Have children
-
Question text = Do you and the other party have minor children together?
-
Learn More prompt = Who qualifies as a minor child?
-
Learn More Help = You should count any child that you and the other party share in common that is under the age of 18 years old as of today’s date.
-
Create 2 buttons.
-
Button 1
-
Label = Yes
-
Variable = Have children TF
-
Default value = true
-
-
Button 2
-
Label = No
-
Variable = Have children TF
-
Default value = false
-
-
-
-
Click on another “New page”
-
Change it to Step 3
-
Change the name to 1-Marital property value
-
Question text = What is the value of your marital property?
-
Create 1 field
-
Type = Number Dollar
-
Label = blank
-
Variable = Marital property value NU
-
-
-
Click on another “New page’
-
Change it to Step 3
-
Change the name to 2-Marital property division
-
Question text = How are you dividing the marital property? Please add the percentage that is going to the Petitioner and the percentage that is going to the Respondent.
-
Create 2 fields.
-
Field 1
-
Type = number
-
Label = Percentage to Petitioner
-
Variable = Marital property percentage to petitioner NU
-
-
Field 2
-
Type = number
-
Label = Percentage to Respondent
-
Variable = Marital property percentage to respondent NU
-
-
-
-
Click on another “New page”
-
Change it to Step 3
-
Change the name to 3-Non-marital property
-
Question text = Do you and the other party have non-marital property?
-
Create two buttons.
-
Button 1
-
Label = Yes
-
Variable = Have nonmarital property TF
-
Default value = true
-
-
Button 2
-
Label = No
-
Variable = Have nonmarital property TF
-
Default value = false
-
-
-
Scroll down to the Advanced Logic section and type the following in the After section (this logic will trigger the Non-Marital Property Form if the user says that they have non-marital property):
-
IF [Have nonmarital property TF] = true
SET [Attached nonmarital prop form TF] TO true
END IF
-
Click on another “New page”
-
Change the step to Step 3
-
Change the name to 4-Petitioner nonmarital list
-
This page will only be displayed to the end user if they say that they have non-marital property. We’ll use simple branching to set that up later.
-
Question text = Please list the Petitioner’s non-marital property and indicate if any of the property was acquired before the marriage, by inheritance, by gift, or some other reason.
-
Create 5 fields.
-
Field 1
-
Type = text (long)
-
Label = List of Petitioner’s non-marital property (include a comma after each item)
-
Variable = Petitioner nonmarital property TE
-
-
Field 2
-
Type = check box
-
Label = Owned before marriage
-
Variable = Petitioner owned before TF
-
-
Field 3
-
Type = check box
-
Label = Inherited
-
Variable = Petitioner inherited TF
-
-
Field 4
-
Type = check box
-
Label = Gift
-
Variable = Petitioner received gift TF
-
-
Field 5
-
Type = check box
-
Label = Other
-
Variable = Petitioner nonmarital other TF
-
-
-
-
Click on another “New page”
-
Change the step to Step 3
-
Change the name to 5-Respondent nonmarital list
-
Question text = Please list the Respondent’s non-marital property and indicate if any of the property was acquired before the marriage, by inheritance, by gift, or some other reason.
-
Create 5 fields.
-
Field 1
-
Type = text (long)
-
Label = List of Respondent’s non-marital property (include a comma after each item)
-
Variable = Respondent nonmarital property TE
-
-
Field 2
-
Type = check box
-
Label = Owned before marriage
-
Variable = Respondent owned prior TF
-
-
Field 3
-
Type = check box
-
Label = Inherited
-
Variable = Respondent inherited TF
-
-
Field 4
-
Type = check box
-
Label = Gift
-
Variable = Respondent received gift TF
-
-
Field 5
-
Type = check box
-
Label = Other
-
Variable = Respondent nonmarital other TF
-
-
-
-
Click on another “New page”
-
Change the step to Step 3
-
Change the name to 6-Order of support
-
Question text = Is an order of support requested?
-
Create two buttons
-
Button 1
-
Label = Yes
-
Variable = Order for support TF
-
Default value = true
-
-
Button 2
-
Label = No
-
Variable = Order for support TF
-
Default value = false
-
-
-
Scroll to the Advanced Logic section. We need to create a condition that displays this question to the end user only if they have said that they have children. Otherwise, the order for support (child support) isn’t relevant to this case. Script the following condition in the BEFORE section:
-
IF [Have children TF] = false
GOTO “10-Debts”
END IF
-
Click on another “New page”
-
Change the step to Step 3.
-
Change the name to 7-Support and time
-
Question text = How much should the court order the Respondent to pay? How frequently should these payments be made?
-
Create 2 fields.
-
Field 1
-
Type = Number Dollar
-
Label = Amount
-
Variable = Support amount NU
-
-
Field 2
-
Type = Text (pick from list)
-
Label = Paid every:
-
Variable = Support paid per MC
-
Internal list = Week \
-
-
-
Month
Quarter
Year
-
Click on another “New page”
-
Change the step to Step 3
-
Change the name to 8-Within Guidelines
-
Question text = Is the amount of %%[Support amount NU]%% within the Child Support Guidelines of A2JAuthor?
-
The %%[Support amount NU]%% is called a variable macro. It calls out the value of the child support that the user has already told you.
-
-
Create two buttons
-
Button 1
-
Label = Yes
-
Variable = Within guidelines TF
-
Default value = true
-
-
Button 2
-
Label = No
-
Variable = Within guidelines TF
-
Default value = false
-
-
-
-
Click on another “New page”
-
Change the step to Step 3
-
Change the name to 9-Support start date
-
Question text = When should the Respondent start paying the support?
-
Create 1 field.
-
Type = Date
-
Label = Support start date
-
Variable = Order of support start date DA
-
-
-
Click on another “New page”
-
Change the step to Step 3
-
Change the name to 10-Debts
-
Question text = Are you going to divide the marital debts in half with each party paying 50%?
-
Create two buttons
-
Button 1
-
Label = Yes
-
Variable = Debt split evenly TF
-
Default value = true
-
-
Button 2
-
Label = No
-
Variable = Debt split evenly TF
-
Default value = false
-
-
-
-
Click on another “New page”
-
Change the step to Step 3
-
Change the name to 11-Division of debts
-
The end user is only going to see this page if they select no to the 50/50 question above.
-
-
Question text = Tell me how the debt will be divided. Put a percentage that will be paid by the Petitioner and a percentage that will be paid by the Respondent. Make sure both add up to 100%.
-
Create 2 fields.
-
Field 1
-
Type = Number
-
Label = Petitioner’s percentage
-
Variable = Petitioner debt percentage NU
-
-
Field 2
-
Type = Number
-
Label = Respondent’s percentage
-
Variable = Respondent debt percentage NU
-
-
-
-
Click on the final “New page”
-
Change the step to Step 4
-
Change the name to 1-The End
-
Question text = Congratulations! You have completed your interview. Based on your answers, up to 3 documents will be assembled for you. Click “Get My Documents” to finish!
-
Scroll to the Button section.
-
Change the label to Get My Documents
-
Change destination to [Assemble - Generate PDF and Process Form]
-
This will send the user’s data to the server to assemble the document(s), download the document(s) for them, close the A2J Viewer, and send their answer file to be saved on the server if the user wants.
-
-
-
-
Now we need to connect all of our pages. Open each page and change the destination to the following (under the Buttons section):
-
1-Introduction to 1-Name
-
1-Name to 2-Gender
-
2-Gender to 3-Other party name
-
3-Other party name to 4-Petitioner or Respondent
-
4-Petitioner or Respondent
-
Petitioner button to 5-Court and County
-
Respondent button to 5-Court and County
-
-
5-Court and County to 6-Testified
-
6-Testified to 1-Marriage date
-
1-Marriage date to 2-Residency
-
2-Residency to 3-Have children
-
3-Have children
-
Yes button to 1-Marital property value
-
No button to 1-Marital property value
-
-
1-Marital property value to 2-Marital property division
-
2-Marital property division to 3-Non-marital property
-
3-Non-marital property
-
Yes button to 4-Petitioner nonmarital list
-
No button to 6-Order of support
-
-
4-Petitioner nonmarital list to 5-Respondent nonmarital list
-
5-Respondent nonmarital list to 6-Order of support
-
6-Order of support (**Reminder - this question has BEFORE logic on it that will branch the end user to 10-Debts if they don’t have children.)
-
Yes button to 7-Support and time
-
No button to 10-Debts
-
-
7-Support and time to 8-Within guidelines
-
8-Within guidelines
-
Yes button to 9-Support start date
-
No button to 9-Support start date
-
-
9-Support start date to 10-Debts
-
10-Debts
-
Yes button to 1-The End
-
No button to 11-Division of debts
-
-
11-Division of debts to 1-The End
-
1-The End to [Assemble - Generate PDF and Process Form]
-
-
Now that we have connected everything, we need to test our complete A2J Guided Interview.
-
Open 1-Introduction. Click Preview
and open the Variables/Script window
-
Go through your A2J Guided Interview and make sure that all of your variables populate and that your advanced logic works properly.
-
When you get to the end, don’t click the “Get Document” button. When you’re in Preview Mode, A2J Templates don’t assemble. Go to the Variables Box and click “Save”. This will download your answer file.
-
-
-
Go to the Template Tab and click “Test Assemble” button
. It’ll prompt you to load the answer file that you saved in the step above. Once it’s loaded, click “Get PDF”.
-
Congratulations! You’ve successfully created your A2J Guided Interview and A2J DAT PDF Template. It should look like this when Test Assembled:


29. Make sure to test assemble with several different answer files, testing the conditions you’ve created that conditionally assemble the Order of Support and the Non-Marital Property Form.
You can access the completed A2J Guided Interview and 3 templates here to compare to your own.
You can also run the A2J Guided Interview and assemble a completed document assembly package here.
If you have any questions or feedback about this Sample Exercise, feel free to reach out to our A2J Author Project Manager Jessica Frank (jessica@cali.org)