
Last updated July 2024
Sample A2J Guided Interview & A2J Template Exercise
This exercise was designed to teach you the basics of automating a document in A2J Author, creating both an A2J Guided Interview and an A2J Template.
Here’s the document we’re going to automate. You can find the Word document to start with here.
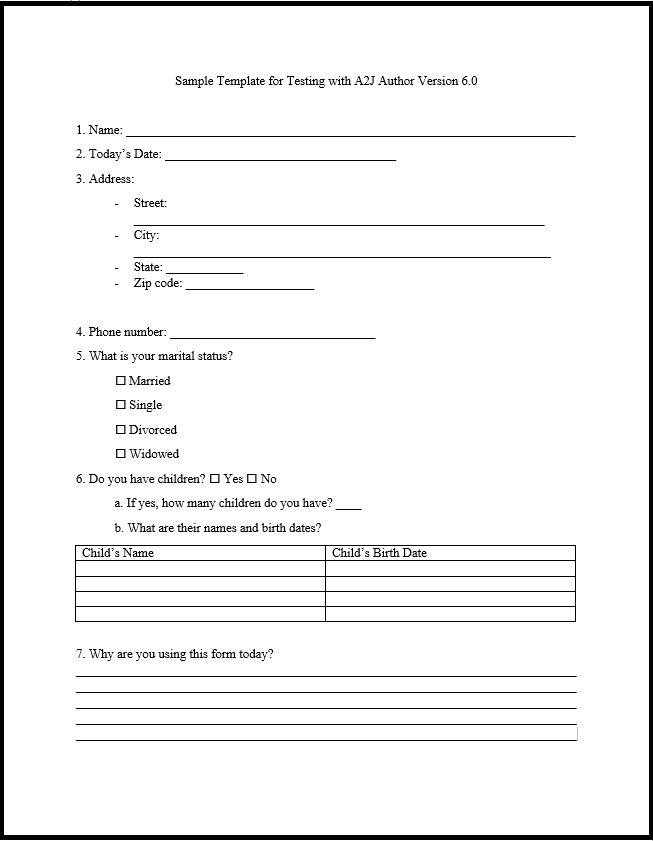
Figure 1: Form to automate
There are two components to a completely automated document - the A2J Guided Interview which interacts with the end user and asks them questions, and the A2J Template, which creates the actual document for the end user.
The process for automating documents in A2J Author’s Document Assembly Tool (A2J DAT) is slightly different than other document assembly software tools. First, you’re going to start by creating your A2J Guided Interview, then you’re going to build your A2J Template in the A2J DAT. The A2J DAT allows you to build elements (aka “chunks of text and logic”) on top of one another to create a finished document, rather than building on top of an existing document. Let’s get started with the A2J Guided Interview first.
A2J Guided Interview
We are going to create an A2J Guided Interview that will later be paired with your A2J Template.
-
Log into your www.a2jauthor.org account. If you aren’t sure how to create an account, check out this resource.
-
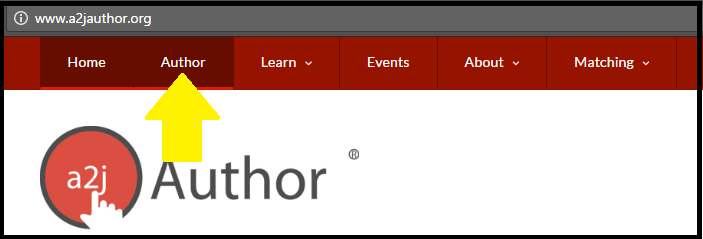
Once logged in, go to the “Author” tab and click it.
-
Then click “Run A2J Author”.
-
A2J Author will open on the “Interviews” Tab. Under “Create a new interview” double click on “Blank Interview.” This will open up a blank A2J Guided Interview. To learn more about authoring in A2J Author, check out our Authoring Guide.
-
A new A2J Guided Interview comes pre-populated with 4 questions. We are going to have 11 questions in our practice A2J Guided Interview. So you will need to create 7 additional questions.
-
Click the New Page button
at the top of the screen 7 times. Your screen should look like Figure 2.
-
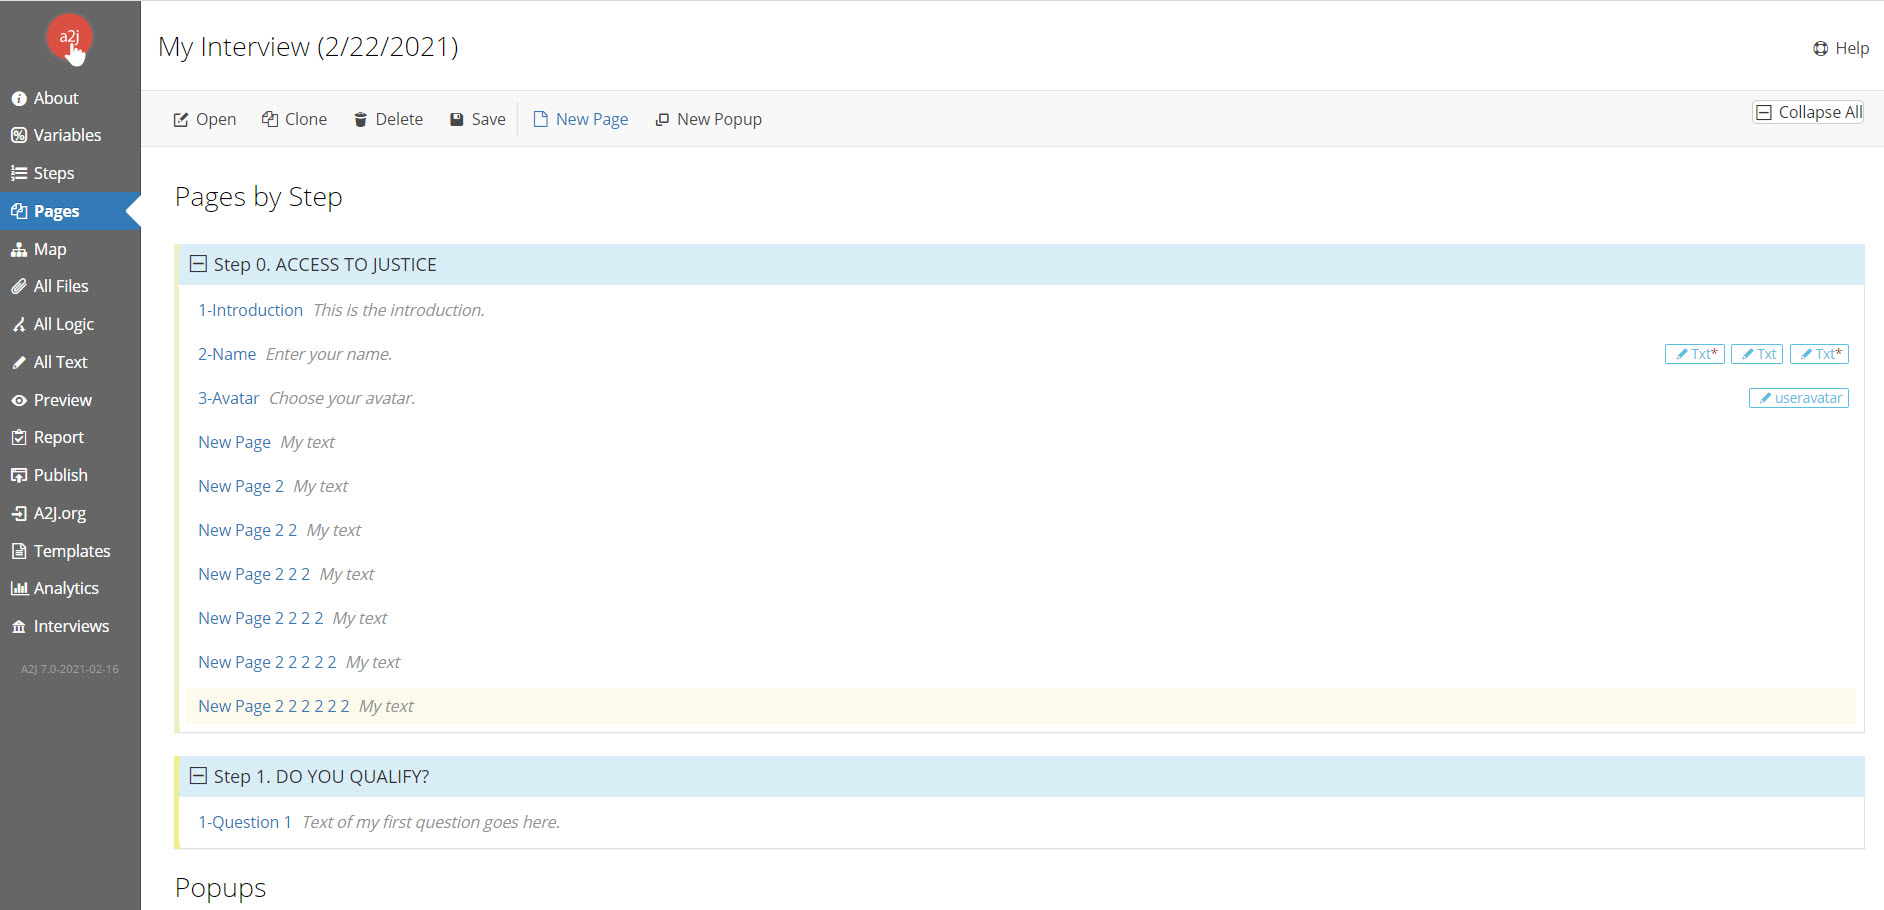
Figure 2: Blank Guided Interview with 11 questions.
-
Go to the About Tab on the left side of the screen and click it. This is the metadata behind your A2J Guided Interview.
-
Change the title to “Sample A2J Guided Interview”.
-
Add in a description of why you are doing this exercises. (Ex. This is to learn how to create an A2J Guided Interview and A2J Template.)
-
Now select the Guide avatar that you would like to appear in your A2J Guided Interview. You can pick a female or male guide. Then you can select the guide's skin tone from five options and their hair color from eight options. As you make your selections, the guide representation updates to the right of your options. (See figure 3 for a gif demonstrating this.) Your end user will have the opportunity to select their own avatar within the A2J Guided Interview.
-
Tab over to the “Authors” section and include your information. This is not shown to the end user in a public facing A2J Guided Interview.
-
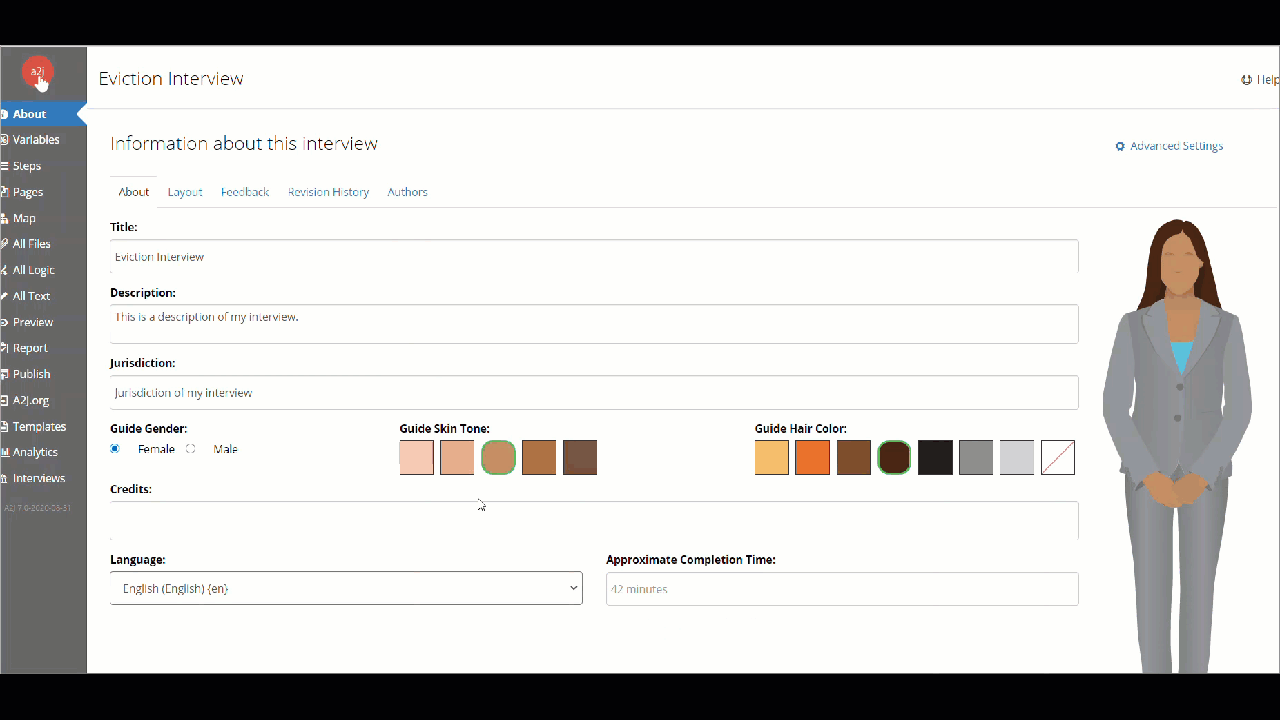
Figure 3: Guide Avatar options and demonstration of changing the options for the avatar.
7. Go to the Variables Tab. We need to create the variables that will be used in the A2J Guided Interview and the A2J Template. Click the “Add” button 
-
Address city TE
-
Type = Text
-
-
Address state MC
-
Type = Multiple Choice
-
-
Address street TE
-
Type = Text
-
-
Address zipcode TE
-
Type = Text
-
-
Child DOB DA
-
Type = Date
-
Check box next to “Check if multiple values” *This tells A2J Author to allow this variable to store multiple values-more on this later*
-
-
Child name first TE
-
Type = Text
-
Check box next to “Check if multiple values”
-
-
ChildCount
-
Type = Number
-
-
Client name full TE
-
Type = Text
-
-
Have children TF
-
Type = True/False
-
-
Marital status MC
-
Type = Multiple choice
-
-
Number of children NU
-
Type = Number
-
-
Phone number TE
-
Type = Text
-
* Note: Phone number variables are generally text variables because you are not going to use them for doing mathematical equations.
-
-
Purpose of form TE
-
Type = Text
-
-
Today date DA
-
Type = Date
-
-
Go to the Steps Tab. There are by default 4 steps. We will need to add 1 additional step. We also need to change the names of the steps.
-
Add an additional step by selecting 5 from the drop down menu. See Figure 4.
-
Change the name of the steps and add step numbers (See Figure 4 below)
-
Step (0) to INTRODUCTION
-
Step (1) to YOUR INFORMATION
-
Step (2) to FAMILY INFORMATION
-
Step (3) to PURPOSE OF FORM
- Step (4) to THE END
-
-

Figure 4: Drop down menu to add an additional step to the default 4 and to change the name of the steps.
9. Go to the Pages Tab
-
Double click on the question (page) that is labeled 1- Introduction.
-
Scroll down to the text box. By default it says “This is the introduction.” Add “This A2J Guided Interview was created as part of a sample exercise. It is not intended for use by the general public.” Close that page.
-
-
Click on the question 2-Name.
-
Change the Step from 0 to 1.
-
Change the name to 1-Name (it is now the 1st question under Step 1, so the question numbering in the question name has to be changed. To learn more about question naming, check out this resource.)
-
Scroll down to the section labeled “Advanced Logic.” In this section, we are going to tell A2J Author to combine the end user’s first, middle, and last names into the variable [Client name full TE] that is used in our A2J template.
-
*NOTE: The brackets around the variable name in this sample exercise instruction set are only intended to separate the variable from the rest of the text. When creating variables, you should not use brackets in the variable name. However, you will need to use brackets in A2J Author when you place variable names into Advanced Logic, Macros, or Functions (see Figure 4 as an example).
-
To do this combination, we have to script some logic that tests if the end user has entered a middle name. If they have, then the variable [Client name full TE] will include the values held by [Client first name TE] + [Client middle name TE] + [Client last name TE]. If they have not entered a middle name, then just the first and last name will populate [Client name full TE]. If we didn’t include the logic as scripted below, there would be an odd extra space in [Client name full TE] if the end user didn’t enter a middle name.
-
Type the logic exactly as it looks in Figure 5.
-
-

Figure 5: The Scripting Logic for testing if the user entered a middle name and setting the variable [Client name full TE].
-
Now you need to test to make sure the logic is working correctly. Click the
button under the logic box (within your Question Design Window). This will take you into the A2J Viewer on this question.
-
Open the Variables and Scripting Window by clicking this button
-
*Note: This is an excellent thing to have open during any testing you do in A2J Author. It allows you to see what is going on behind the scenes in your A2J Guided Interview.
-
Type in a first and last name in the question fields. Click “Continue.” Look in the scripting box and make sure the condition evaluated properly. It should look like Figure 6. To see the variables in the blue variables section, you may need to scroll down a bit to get to [Client first name TE], etc. The variables section shows the variables in alphabetical order.
-


Figure 6: Testing logic with no middle name.
-
Now hit the Back button (the A2J Author internal one, not your browser’s back button)
. This will take you back to the Name question.
-
Type in a first, middle, and last name. Click “Continue”. Look at the scripting box now and make sure it looks like Figure 7. If it does, then you have successfully scripted your first advanced condition! If not, go back and re-do the steps above.

Figure 7: Testing logic with a middle name.
-
Go back to the Pages Tab by clicking “Resume Edit”
, then closing the Question Design Window for the Name page. Open the question called 3-Avatar by double clicking on it. Change the Step Number to 1 by clicking into the field labeled “Step.” A drop down menu of all your available steps will appear. Click Step 1. Change the name of the question to 2-Avatar by clicking into the Name field and typing it in.
-
This question is used to populate the end user’s avatar. An end user may wonder why this question is being asked. It is a good practice to include a Learn More to explain.
-
In the Question Text section of the Question Design Window, find the field labeled “Learn More prompt”. In that space type, “Why are you asking this question?”
-
In the “Help” field (this is the reply the guide avatar gives) type, “This question is used to populate the avatar that will represent you through the rest of this A2J Guided Interview.”
-
Click close.
-
-
Open the question called “New page” and change the Step to 1. Change the name to 3-Address.
-
In the text box type, “What is your address?”
-
Scroll down to the Fields section. Select 4 from the “Number of fields.” The Field information will now appear for 4 fields. Here is where we are going to collect the end user’s address.
-
In the first field, change the label to “Street” (this will appear in front of the field where the end user will type in their street address). The variable should be [Address street TE]
-
*Note: When you start typing a variable, A2J Author will offer up suggestions from your list of variables that match the letters you have typed.
-
-
In the second field, change the label to “City” and the variable should be [Address city TE]
-
In the third field, change the type to “Text (Pick from list)”, change the label to “State” and the variable should be [Address state MC].
-
We are now going to add in a list of U.S. states in alphabetical order. Instead of making you type that list in, download the list in xml format here. Save it some place on your computer.
-
Click the “Upload” button next to “External list.” Navigate to where you saved that U.S. states xml list and click open.
-
-
In the fourth field, change the type to “Number ZIP code,” change the label to Zip code, and the variable should be [Address zipcode TE]. Close the Question Design window for this question.
-
-
Open the question called “New page 2” and change the Step to 1. Change the name to 4-Phone number.
-
In the notes section write: This question also sets the logic for TODAY.
-
On this question, we will use advanced logic to set the variable [Today date DA] as well as collect the value for the variable [Phone number TE].
-
-
In the text box type: “What is your phone number?”
-
Create 1 field in the Fields section. The type should be “Number Phone,” the label “Phone number,” and the variable is [Phone number TE].
-
Scroll down to the Advanced Logic section. In the After box type (no quotes) “SET [Today date DA] TO TODAY”
-
-
-
Open the question called “New page 2 2” and change the Step to 2. Change the name to 1-Marital Status.
-
In the text box type, “What is your marital status?”
-
Scroll down to fields and create 4.
-
In the first one, make the type “Radio Button.” The label should be “Married,” the variable is [Marital status MC], and the default value is Married.
-
In the second field, the type is “Radio Button,” the label is “Single,” the variable is [Marital status MC], and the default value is Single.
-
In the third one, the type is “Radio Button,” the label is “Divorced,” the variable is [Marital status MC], and the default value is Divorced.
-
In the fourth one, the type is “Radio Button,” the label is “Widowed,” the variable is [Marital status MC], and the default value is Widowed. Click close.
-
-
Open the question called “New page 2 2 2” and change the Step to 2. Change the name to 2- Have children?
-
In the text box type, “Do you have children?”
-
Scroll down to the Buttons section. Select 2 buttons from the drop down list.
-
The first button should have the label “Yes,” the variable is [Have children TF] and the default value is “true” (no quotes when you type it into A2J Author)
-
*Leave the destination question to [no where] for now. We’ll set that later on.
-
-
The second button should have the label “No,” the variable is [Have children TF] and the default value is “false” (no quotes when you type it into A2J Author)
-
-
Close this question.
-
-
Open the question called “New page 2 2 2 2” and change the Step to 2. Change the name to 3-How many children?
-
In the text box type, “How many children do you have?”
-
Scroll how to the Fields section. Create 1 field. The type should be Number (Pick from list), the label is “Number of children,” the variable is [Number of children NU], the Min value is 1, and the Max value is 4.
-
*Note: We are limiting the maximum number the end user can input because we only have 4 lines on our A2J template. You could also let your end user know in a Learn More why the number is restricted.
-
-
We are going to create a repeat loop to capture the information about the user’s children. To learn more about repeat loops, check out this resource.
-
Go to the Question Design Window for 3-How many children? Scroll down to the Buttons section. Under Repeat Options, change it from “Normal” to “Set Counting Variable to 1.” In the Counting Variable field type, ChildCount.
-
-
Click close.
-
-
Open the question called “New page 2 2 2 2 2” and change the Step to 4. Change the name to 1-The End.
-
In the text box type, “Congratulations! You have finished your A2J Guided Interview. Click Get My Document to print your completed form.”
-
*Note: In your real document assembly project, you may wish to include instructions on how the end user will get their document. This will vary based on which server your A2J Guided Interview is hosted.
-
-
In the Buttons section, change the button label to “Get My Document”. Change the Destination question by clicking on the blue button next to “Destination.” Change it to [Assemble-Generate PDF]. Click Change. Click Close.
-
-
Open the question called “1-Question 1” and change the Step to 3. Change the name to “1-Purpose of form.”
-
Type in the text box, “Why are you filling out this form?”
-
Create 1 field. The type is Text (Long), delete the word “label”, and the variable to use is Purpose of form TE.
-
Edit the button label to “Continue” and set the Destination to 1-The End. Click Change. Click Close.
-
-
Open the question called “New page 2 2 2 2 2 2” and change the Step to 2. Change the name to 4-Child’s name and birthdate.
-
Type in the text box, “What is your child’s name and date of birth?”
-
In the Question text section, scroll down to where it says “Counting Variable.” Type in ChildCount. This lets A2J Author know that this question is to be repeated to the end user because it is part of the repeat loop.
-
Create 2 new fields in the Fields section.
-
The first one should be a text type, label should be “Child’s first name:”, and the variable is [Child name first TE].
-
The second one should be a date type, the label should say “Date of birth:”, and the variable is [Child DOB DA].
-
-
In the Advanced Logic section we have to create a condition with two parts. The first part of the condition tests whether the user has gone through the repeat loop enough times. We are comparing the times they have gone through the loop to the number of children they said that they had. The second part of the condition will increment the counting variable if the end user has not gone through the loop enough times, letting A2J Author know the end user has gone through another iteration of the repeat loop. The logic goes in the “After” logic box and should be typed exactly like this (including all brackets and quotation marks):
-
IF [ChildCount] = [Number of children NU]
GOTO “1-Purpose of form”
ELSE
SET [ChildCount] TO [ChildCount] + 1
GOTO “4-Child’s name and birthdate”
END IF
-
Click Close.
- Now that we have created all of our questions, we need to connect them to one another.
-
Open up each question and go to the Buttons section. The questions should be connected through the Destination option as follows. Change any that are not connected this way.
-
1-Introduction to 1-Name
-
1-Name to 2-Avatar
-
2-Avatar to 3-Address
-
3-Address to 4-Phone number
-
4-Phone number to 1-Marital Status
-
1-Marital Status to 2-Have children?
-
2-Have children (Yes option) to 3-How many children?
-
2-Have children (No option) to 1-Purpose of form
-
3-How many children? to 4-Child’s name and birthdate
-
4-Child’s name and birthdate to [no where] (branching done in Advanced logic)
-
1-Purpose of form to 1-The End
-
1-The End to [Assemble-Generate PDF]
-
-
-
Now that we have connected everything, we need to test our complete A2J Guided Interview.
-
Open 1-Introduction. Click Preview
and open the Variables/Script window
-
Go through your A2J Guided Interview and make sure that all of your variables populate and that your advanced logic works properly.
-
When you get to the end, don’t click the “Get Document” button yet. You haven’t built your template yet, so a blank document will assemble if you hit it. Go to the Variables Box and click “Save” (see figure 8). This will download your answer file. We are going to now use that to test your A2J Template later.
-
-
-
Congratulations! You’ve successfully created your A2J Guided Interview. Now it’s time to move on to the A2J Template. Click “Resume Edit” to return to the authoring interface. Then close the question design window for the question you are in.

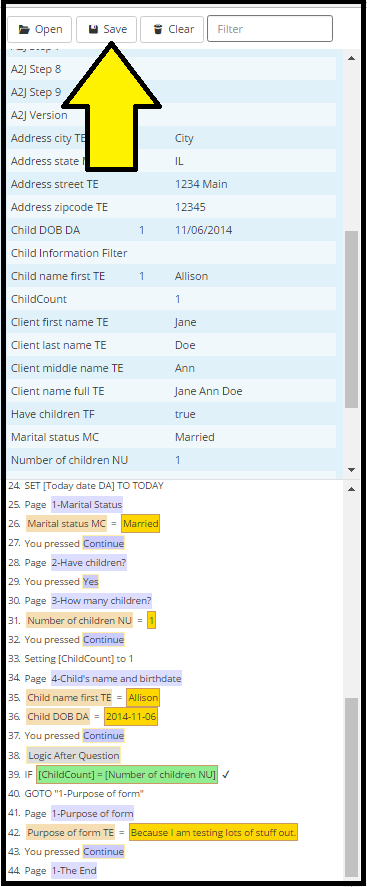
Figure 8: Save answer file
A2J Template
Now it’s time to build your A2J Template.
-
Go to the Templates Tab. Because you haven’t created a template for this A2J Guided Interview, it will say “There are no templates at all. Create one!” (See figure 9) We are going to be creating a Text Template.
-
*Note: Templates are unique to a specific A2J Guided Interview. There can be multiple templates within a single A2J Guided Interview, but only 1 Guided Interview per template.
-

Figure 9: Templates Tab without any templates in it.
-
Click the “Create Text Template” button
 on the upper right hand side of the screen to create a new template. See Figure 10 for what it looks like after you click the Create Text Template button.
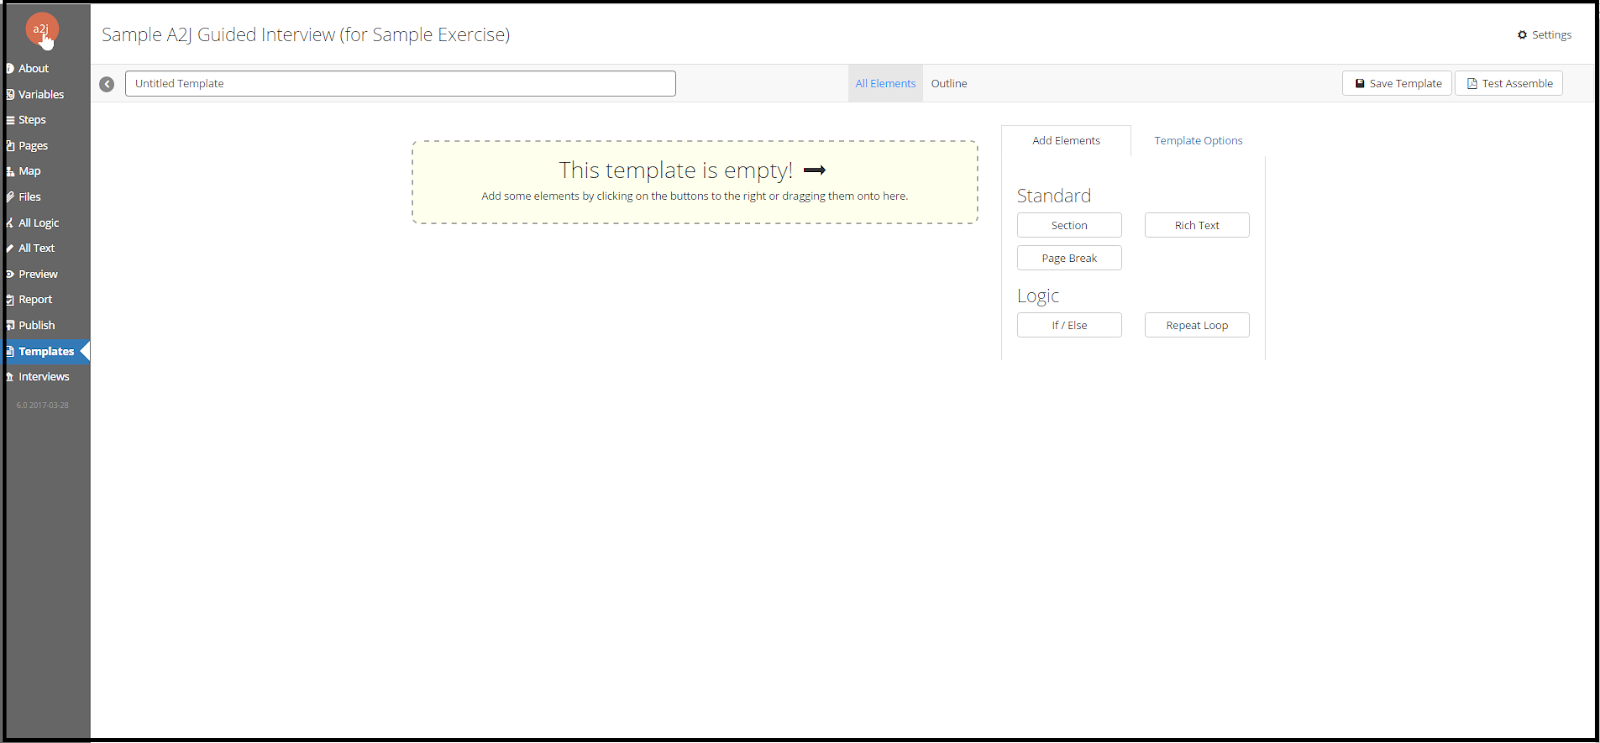
Figure 10: Blank template
-
Your new template is blank. You will add elements to build your A2J Template. First, let’s adjust the options that will affect your entire template. Those are found under the Template Options tab in the Template Design Sidebar (See gif in Figure 11).
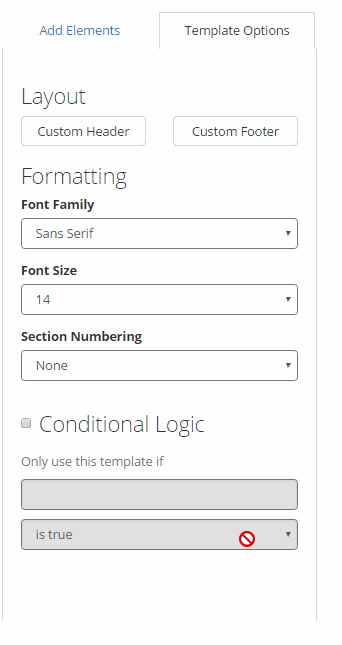
Figure 11: Switching from the Add Elements Tab to the Template Options Tab in the Template Design Sidebar.
-
The form we’re automating uses Times New Roman font in size 12. Change your font family and font size to match that.
-
Next add a custom header by clicking the “Custom Header” button
. Once you create the custom header, a text editor will appear (see figure 12). In that editor, choose to center align the text by clicking the center align button
. Type “Sample Template for Testing with A2J Author”. Embolden the text by clicking the bold button
. Also change the font size to 14 since this is a heading
. Click “Save & Close”. We don’t need any of the other options on this tab for this exercise, but if you want to learn more about the Template Options, check out this section of the A2J Authoring Guide.
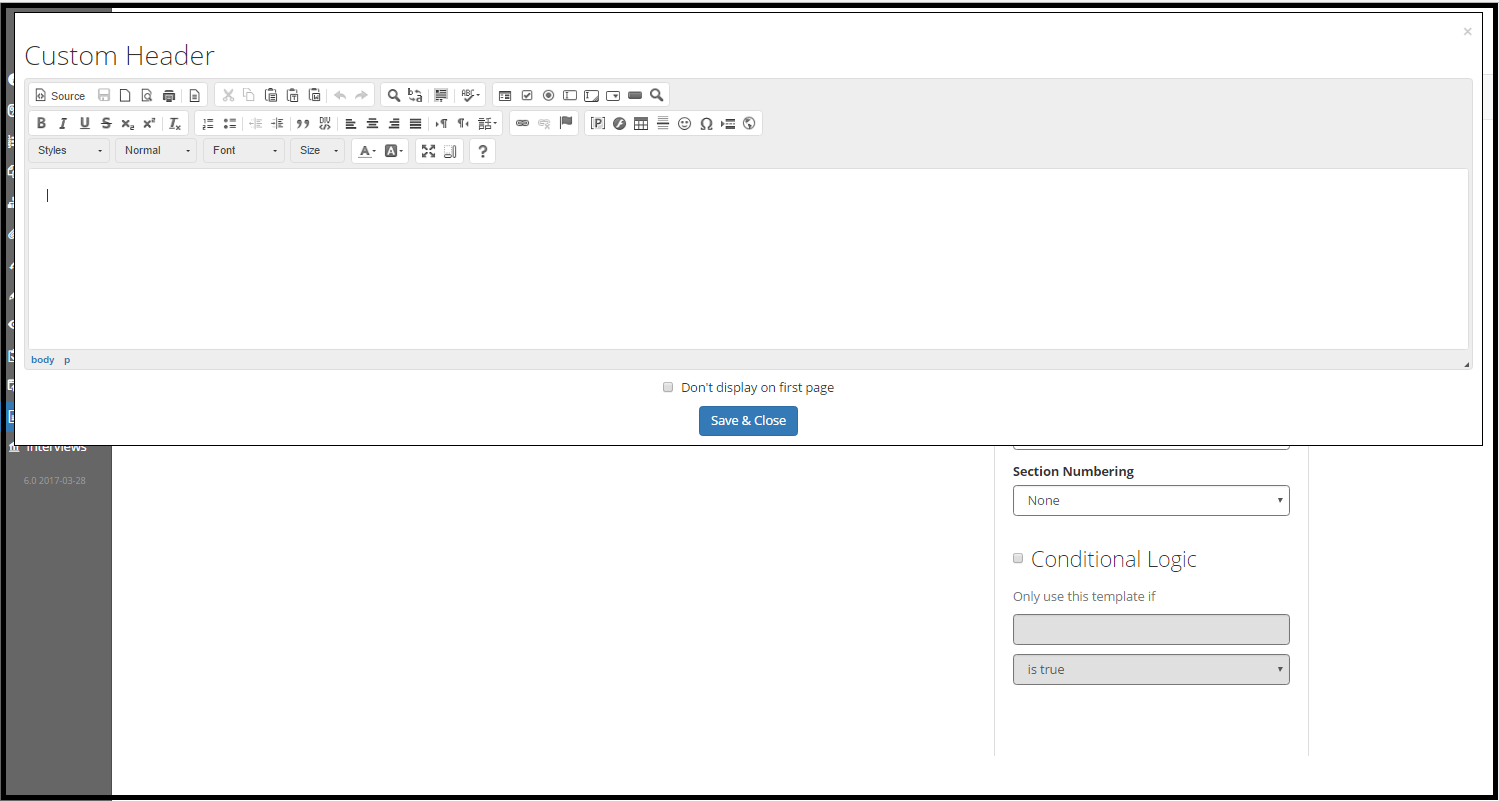
Figure 12: Custom Header text editor.
-
Now we can start adding elements to this Template. Switch back to the Add Elements Tab in the Template Design Sidebar. The first element in our form to automate is a rich text element. Click the “Rich Text” button
. The Rich Text editor will appear. It looks just like the text editor in the Custom Header. See Figure 13.
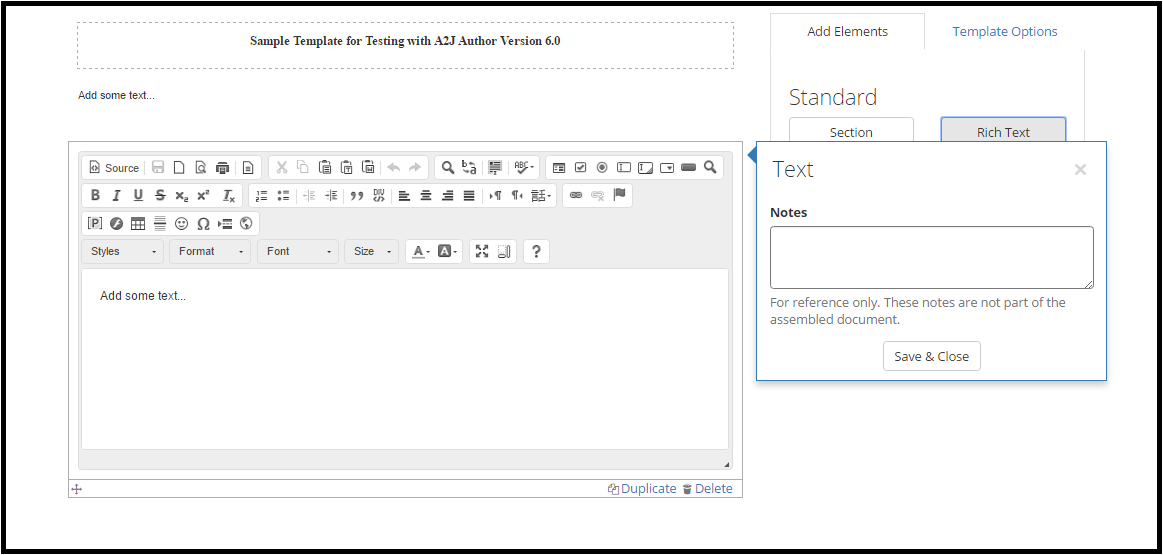
Figure 13: Rich Text Editor.
-
In this new element, we’re going to automate the first 4 lines in the form and part of the 5th. Watch this short video to see how that’s done. Note the indentation and styles formatting.
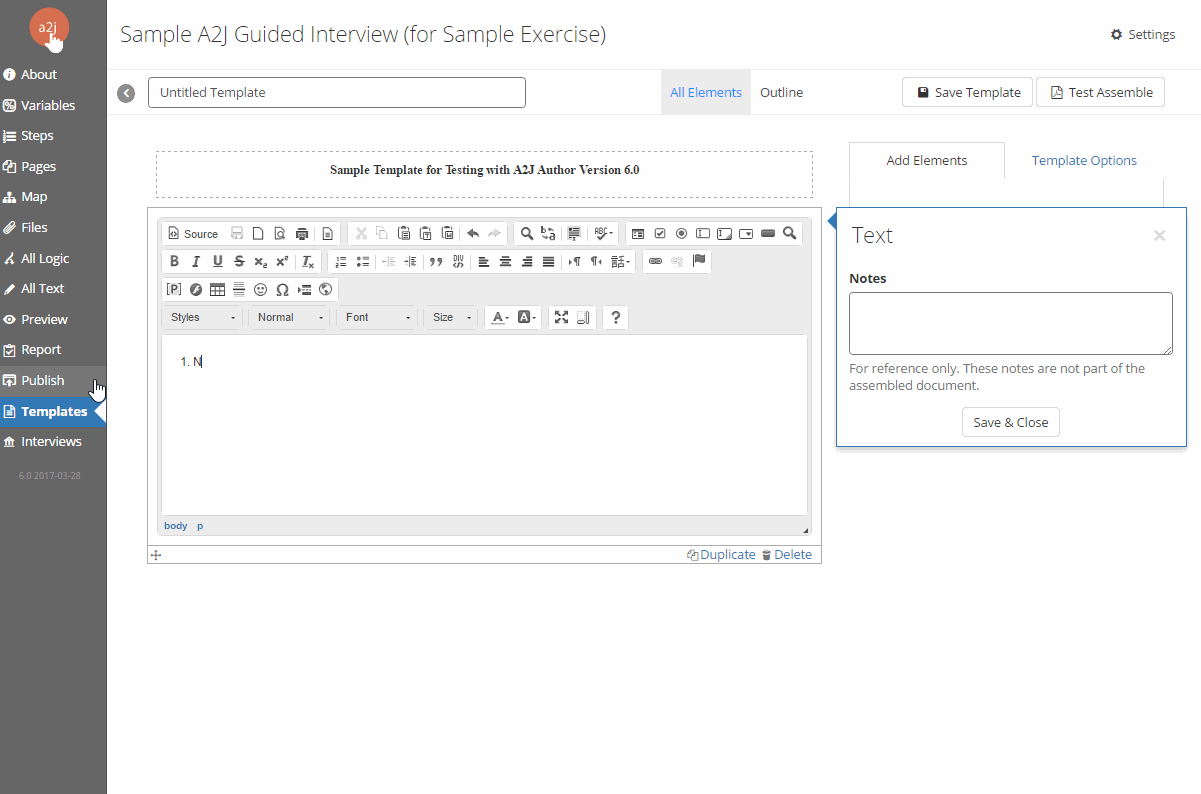
Figure 14: Adding lines 1-5 to the A2J Template.
-
Make sure to periodically save your template. You can do this by clicking the “Save Template” button
.
-
Now that you’ve added lines 1-4 and part of 5, we need to automate the check boxes for marital status. That will require some IF/ELSE elements. To remind you, the variable for the “what’s your marital status” question is [Marital status MC]. It is a multiple choice variable. We’re going to create 4 elements that will be conditionally inserted into the template based on the answer to that question. Click the “If/Else” button
in the Add Elements tab of the Template Design Sidebar. It will open up the If/Else element editor. (See figure 15).
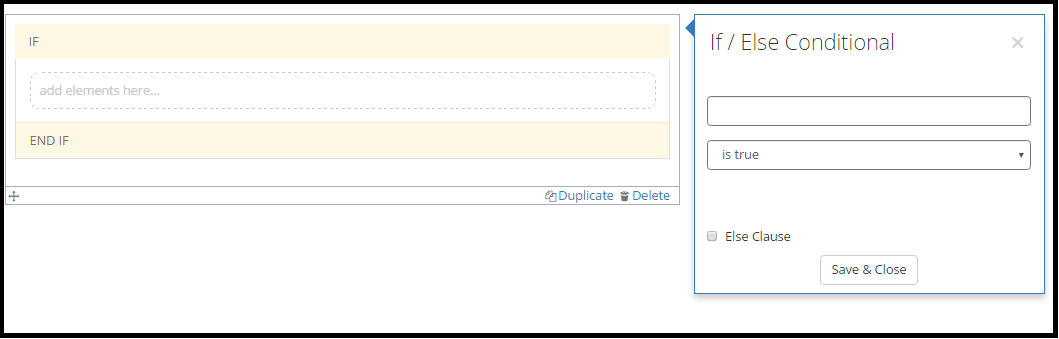
Figure 15: If/Else Element Editor
-
The first IF/ELSE conditional will test whether the answer held by [Marital status MC] is “Married”. Remember in Question 8(f)(iii) above, you should have capitalized the word “Married”.
-
To set the condition, start typing “Marital status MC” (no quotes) in the open field. A2J Author will start to create a list of variables that match the characters that you have typed. Select “Marital status MC” when it populates in the list.
-
Change the 2nd field drop down list to “equals” (from “is true”).
-
Change “Variable” to “Text” in the third field.
-
Type “Married” (no quotes) into the 4th field.
-
Check the “Else Clause” box
. The ELSE section is for all the times [Marital status MC] does not equal “Married”. In this case, you’ll want a checked box if the user is married and an unchecked box if the user is not married. Your IF/ELSE conditional should look like Figure 16 now. If it does, hit the “Save & Close” button
in the element.
-
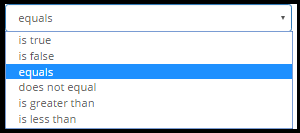
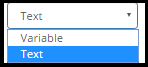
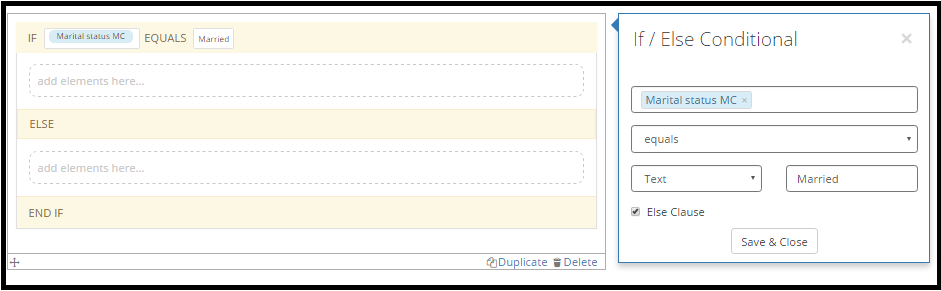
Figure 16: IF/ELSE conditional element when “Married” is tested condition.
-
Click into the area that says “add elements here…”. When you do, an Add Elements dialog box will appear. You can add Sections, Rich Text, Page Breaks, and Repeat Loops within an IF/ELSE conditional element. We’re going to add “Rich Text”. Click that button. It will add the text editor into your IF/ELSE conditional.
-
In the rich text editor, indent the text
, then select the checkbox icon
. The Checkbox Properties box will open up. Check the “Selected” box
. This will insert a checked box in your rich text element.
-
Type the word “Married”. Hit “Save & Close”.
-
In the ELSE section, click into the area that says “add elements here…” When you do, an Add Elements dialog box will appear. Click “Rich Text”. The text editor will be added to your conditional.
-
In the rich text editor, indent the text, then select the checkbox icon. When the Checkbox Properties box open, leave the “Selected” box unchecked. This will insert an unchecked box in your rich text element.
-
Type the word “Married”. Hit “Save & Close”. Watch the gif in Figure 16 to see the whole process.
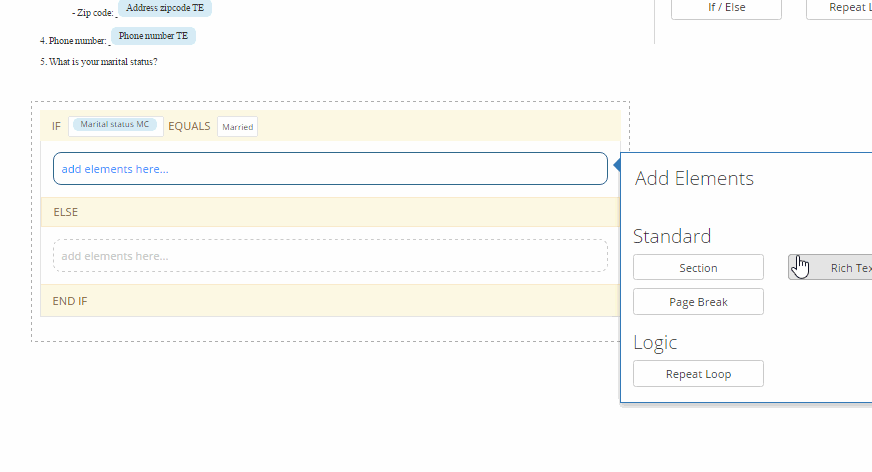
Figure 17: GIF showing how to create a checked and unchecked box.
-
Repeat step 9 for the other options for [Marital status MC]. When you’re done, your template should look like Figure 18.
-
Single
-
Divorced
-
Widowed
-

Figure 18: GIF showing the template created through Step 11.
-
We now need to add in another IF/ELSE conditional element to handle the part of the form that relates to whether the end user has children and if they do, how many. Click the “IF/Else” button in the Add Elements tab of the Template Design Sidebar. The variable to test is [Have children TF]. The condition is if [Have children TF] is true. Also, check the “Else Clause” check box to include a space for the Else elements. Click “Save & Close”. See Figure 19.

Figure 19: IF/Else conditional for [Have children TF]
-
In the section under “If [Have children TF] is TRUE”, click into the field that says “add elements here…” Add a rich text element.
-
In the rich text element, type “6. Do you have children?”
-
Add a checked box and the word “Yes”, then an unchecked box and the word “No”
.
-
On the line underneath that, indent the text, then type “a. If yes, how many children do you have?”
-
Add the variable [Number of children NU] next to the question mark.
-
Change the variable’s style to make it underlined. (See the short video on Step 7 for a refresher on how to do this.)
-
On the next line, type “b. What are their names and birthdates?” Hit “Save & Close”. It should look like Figure 19.
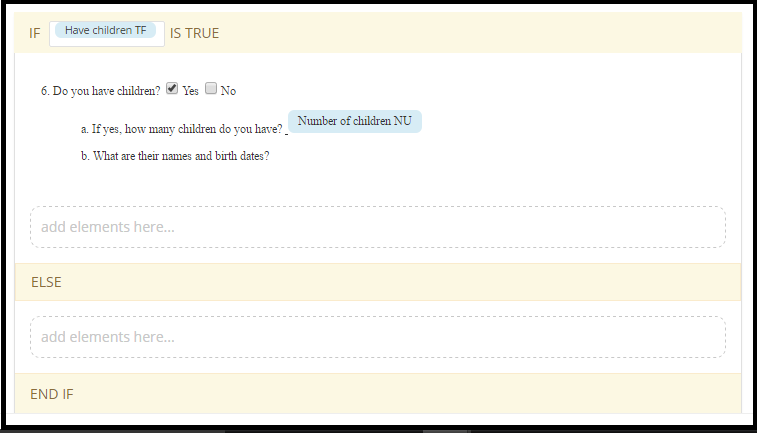
Figure 20: [Have children TF] IF/Else element, IF TRUE section.
-
-
In the Else section, add a rich text element.
-
Type in “6. Do you have children?”, add in an unchecked box, then the word “Yes”. Add in a checked box, then the word “No”.
-
Under that, indent the text, then type “a. If yes, how many children do you have?” You don’t need to add the variable [Number of children NU] because this section of the Template will only display if the user doesn’t have children.
-
Under that add, “b. What are their names and birthdates?” Hit “Save & Close”.
-
-
Now we need to add the Repeat Loop that will contain the children’s names and birthdates to the IF part of the element that you just worked on. Under the rich text element containing the “Yes” checkbox, click “add elements here…”
-
Add a repeat loop element to the IF/ELSE element. See figure 21.
-

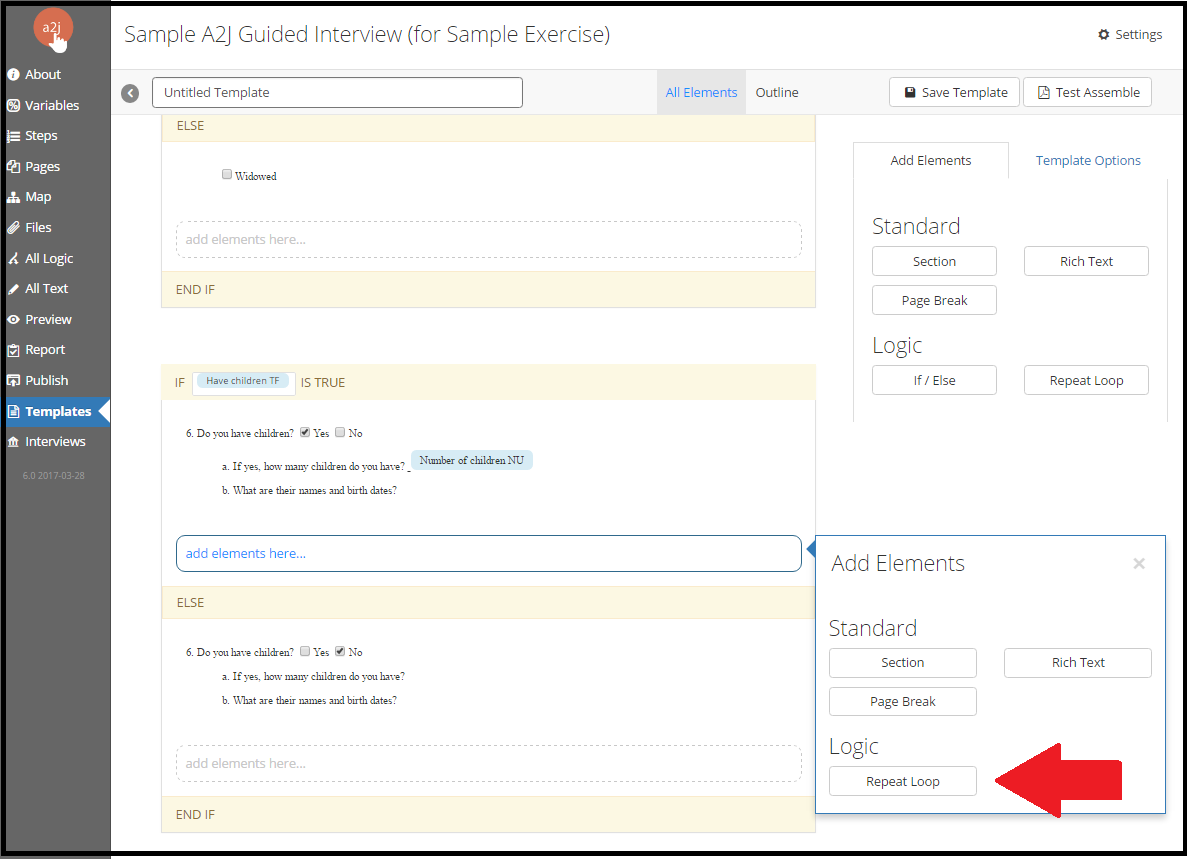
Figure 21: Adding a repeat loop element inside an IF/ELSE element.
-
In the document that we’re automating, the table containing the children’s names and birthdates does not contain a title, so you can delete the phrase “This is the loop title” in the repeat loop options. You can also ignore the title size.
-
For the “Repeat each:” option, select “For each variable,” and add the variable [ChildCount] to the blank field next to it. See figure 22.

Figure 22: Repeat each options
-
We want the repeat loop to be in a table format and have borders, so the default settings in the A2J DAT are fine. We need to add another column to the table though to accommodate name and birthdate. Click the plus button
next to the column. This will add another column and adjust the spacing to 50% each.
-
Highlight the words “Column 1” and replace them with “Child’s Name”.
-
Highlight the words “Column 2” and replace them with “Child’s Birth Date”.
-
Now move your cursor over to the box in the template underneath “Child’s Name” and click into it. Start typing “Chid name first TE” (no quotation marks). The A2J DAT will pull up a list of variables matching those typed characters and you can select it to fill the field with that variables.
-
Do the same thing under “Child’s Birth Date” with the variable [Child DOB DA]. Save & Close this element. See Figure 23 for a gif on adding variables and saving.
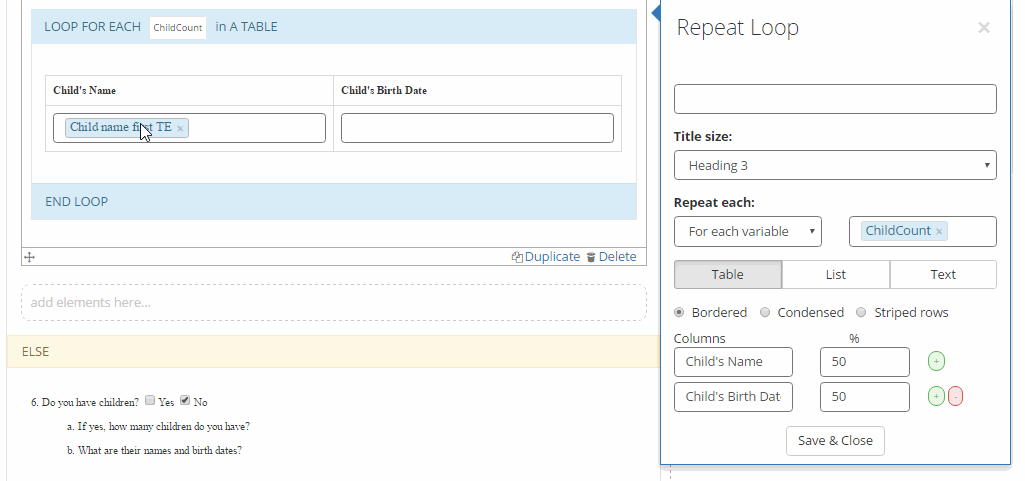
Figure 23: Adding variables to a repeat loop elements and saving & closing.
-
The final section to automate is the question that asks the end user why they are using the form. Underneath your IF/ELSE elements, add a Rich Text element from the Template Design Sidebar.
-
In it, type “7. Why are you using this form today?”
-
Hit enter
-
Add the variable [Purpose of form TE].
-
Change the style on that variable to underlined.
-
Hit “Save & Close”
-
Hit “Save Template” at the top of the screen.
-
-
The final step is to test assemble our completed template with our A2J Guided Interview.
-
You’ve already created an answer file in step 9 above. We’re going to use it to test our A2J Template. Click the “Test Assemble” button
near the top of screen. A dialog box will appear that asks you to load an answer file. See figure 24.
-
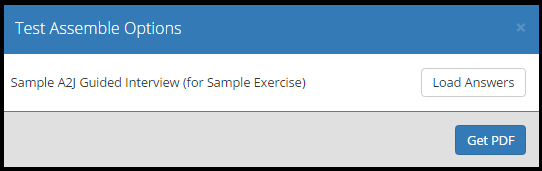
Figure 24: Test Assemble dialog
-
Click “Load Answers” and select the answer file you saved before. It’ll have the extension .anx. Once you load the answer file, click “Get PDF” and the document will generate. Review it and ensure you’ve properly automated it.
Congratulations! You have successfully created your first A2J Guided Interview and A2J Template.
If you have any questions, check out our A2J Authoring Guide or our A2J Author YouTube Channel. You can also contact webmaster@a2jauthor.org with any issues.
