
Introduction
The download package described below can be obtained here (.zip).
The material on this page is rather technical in parts. It is most relevant to webmasters and system administrator who must setup an A2J interview on their website. The information on this page is not useful to authors of A2J interviews. Nothing here relates to what you put into an interview.
This document explains how to do two things. The reason I am putting these two into the same document is that it is quite likely that if you are setting up A2J Author® on your own server, you are probably interested in what you can do with the answer files you get from an A2J Author® interview. The data coming from an A2J Author® interview is formatted in HotDocs XML format (HotDocs refers to these as .ANX files or AnSwer Xml file. This is in contrast with .ANS files which is ANswer Native format). I have included a copy of the HotDocs XML DTD below and a link to it on the HotDocs website for reference.
What You Need To Get Started
Users of your A2J Author® interviews will require that the Adobe Flash Player be already installed. The link for the latest version of the Flash player is here.
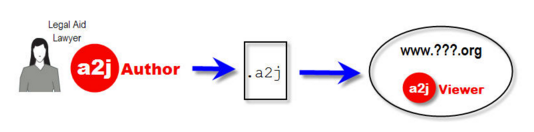
A2J Author® can be downloaded here.
Here is a blank output from the XSL transform for the Iowa Intake Interview. I find this useful for reference. From there you can also find text versions of the XSL output and the XSL file itself.
How A2J Author® Works
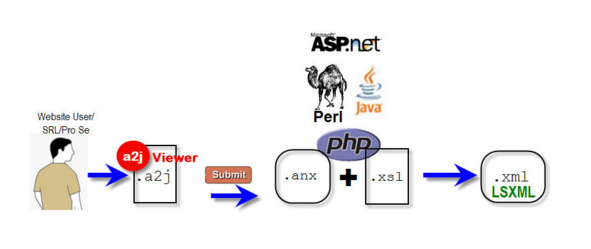
Once you download and install A2J Author®, you can use it to create A2J Guided Interviews® that ask questions - one screen at a time - and gather information from the user. Some interviews will provide links to the user that take them to other websites. Sometimes the user will not meet all of the criteria that is required for the completion of the interview. When the interview "discovers" that a criterion has not been met, the interview will exit to some other webpage. If the user makes it to the end of the interview, they are prompted to submit SEND or SUBMIT (the text is determined by the author of the interview), then the data gathered by the interview is sent to a server for processing.
In the case of interviews created by legal aid lawyers for court forms, the most common destination is the LawHelp Interactive server which hosts A2J Guided Interviews for all states. The data from the interview is combined with a previously created HotDocs template, and the resulting form is sent back to the user in the form of a PDF or Microsoft Word document (.doc). The user can then print it out, sign it and submit it to the court.
NOTE: You DO NOT have to send the results of an A2J Guided Interview to LHI. The destination of the Guided Interview data can be some other server and that's what this document is about.
Guided Interviews created in A2J Author® are run by the user visiting your website using another piece of software called the A2JViewer. This is a program written in Adobe Flash that sits on your website and is run when the user visits the web/HTML page where you have embedded the link to A2JViewer. A2JViewer is not the interview - it is a generic viewer of any interview created with A2J Author®. When A2JViewer loads, it looks for the interview that you tell it to look for. The file name of the interview is also embedded inside the web/HTML page. Basically, you create one HTML page per interview. Inside that HTML file are some javascript variables that A2JViewer uses to determine the following...
templateURL - the website URL for the A2J Author® interview file (this is the file with the .a2j extension, but you can rename it anything you like)
fileDataURL - this is the directory where the audio/MP3 files for the interview can be found. MP3 files are recorded/created outside of A2J Author® and uploaded separately from the interview itself.
getDataURL - the website URL of where you have previously stored the user's partially completed interview answer data. This is optional and only needed if you are setting up your website to remember the data that a user has entered so far. This is interesting where you let people register at your website and collect information that you can use in all interviews on your website and information that might be common to all interviews (like name, address, etc.). At present, this DOES NOT mean that the user can save the interview at a particular point and then come back to that same point. When they return to the interview later, they must start from the beginning - with the only advantage being that the data they had previously entered is already filled in.
setDataURL - website URL of where you want to send the data from the interview when the use SENDs or SUBMITs the completed interview. This must be some website-based program that can "catch" the XML data stream that contains the user's answers to your interview in HotDocs .anx format.
exitURL - website URL is where the user's browser is directed if they exit an interview without getting to the end. This is typically because they don't qualify to use the service. This is the DEFAULT URL. Inside the interview, the author can actually point the EXIT button to any URL they want and it will override this value. This URL is used only if the author has not specified a URL inside the interview for any EXIT buttons.
What Happens When The User Clicks SEND/SUBMIT?
When the user successfully reaches the end of an interview and clicks SEND/SUBMIT, A2JViewer sends the user's data to the website URL specified in the setDataURL javascript variable. There must be a web-based program that can catch the data. Included in the download package is A2JSetData.php which shows how this works in PHP.
The relevant code looks like this...
<?php

session_start();
$XML=stripslashes($_REQUEST['AnswerKey']);$_SESSION['XML']=$XML; ?>
When this bit of PHP code runs, the user's interview data is stored inside the $XML variable and it is stored in the $_SESSION array and so is available for further processing.
The next bit of code shows how to setup the XSL processor that is part of the SimpleXML PHP library. SimpleXML is part of most standard PHP installation packages, but you can find out more here. SimpleXML requires PHP5.
// Create new XSLTProcessor
$xslt = new XSLTProcessor();
//Both the source document and the stylesheet must be //DOMDocuments, but the result can be a DOMDocument, //a file, or even a String. //Load the XSLT stylesheet $xsl = new DOMDocument(); $xsl->load('interviews/IowaIntake/IowaIntake2LSXML.xslt');// Load the stylesheet into the processor $xslt->importStylesheet($xsl);// Load XML input file $xmlobject = new DOMDocument(); //$xml->load('recipe.xml'); $xmlobject = simplexml_load_string($xml);
The last line is where the user's interview data is transformed by the XSL file into LSXML. The result is inside the $xmlobject variable and you can do whatever you want with it. Here is some sample code that shows three ways to output the LSXML data...
// Transform to a string
$results = $xslt->transformToXML($xmlobject);
echo "String version:";
echo htmlentities($results);


// Transform to DOM object
$results = $xslt->transformToDoc($xmlobject);
echo "The root of the DOM Document is ";
echo $results->documentElement->nodeName;


// Transform to a file
$results = $xslt->transformToURI($xmlobject, 'results.txt');
The first example converts the XML object into a string.
The second example converts the XML object into a DOM object.
The last example saves the XML object as a file on the webserver.
These are provided for illustrative purposes. At this point, the user's interview data is on your website in LSXML format and ready for you to import into your database system.
The download package contains all of the sample code mentioned above as well as the XSL file I created for the Iowa Intake Interview that transforms their interview into LSXML format. Here is a short description of all of the files in the package and their purpose...
| \a2j\Server | directory |
| \a2j\Server\A2JGetData.php | sample PHP code showing how to load data into a previously run interview. |
| \a2j\Server\A2JSetData.php | sample PHP code showing how to catch interview data when the user hits SEND/SUBMIT. |
| \a2j\Server\interviews | directory |
| \a2j\Server\interviews\IowaIntake2LSXML.xsl | xsl tranform file that converts the interview data from the Iowa Intake Interview into LSXML format |
| \a2j\Server\interviews\IowaIntakeInterview.a2j | Iowa Intake Interview .a2j file |
| \a2j\Server\shared | directory |
| \a2j\Server\shared\A2JLibrary.swf | used by A2JViewer.swf |
| \a2j\Server\shared\A2JViewer.ini | user by A2JViewer to list what avatars and languages are available and to show where to send the user when the SEND FEEDBACK button is pressed. |
| \a2j\Server\shared\A2JViewer.php | sample PHP file that embeds the A2JViewer |
| \a2j\Server\shared\A2JViewer.swf | SWF file that runs A2JAuthor interviews |
| \a2j\Server\shared\ComponentServer.swf | used by A2JViewer.swf |
| \a2j\Server\shared\Avatars | directory |
| \a2j\Server\shared\Avatars\blank_guide2female.swf |  |
| \a2j\Server\shared\Avatars\blank_guide2front.swf |  |
| \a2j\Server\shared\Avatars\blank_guide2male.swf |  |
| \a2j\Server\shared\Avatars\blank_pick.png |  |
| \a2j\Server\shared\Avatars\tan_guide2female.swf |  |
| \a2j\Server\shared\Avatars\tan_guide2front.swf |  |
| \a2j\Server\shared\Avatars\tan_guide2male.swf |  |
| \a2j\Server\shared\Avatars\tan_pick.png |  |
| \a2j\Server\shared\Languages | directory |
| \a2j\Server\shared\Languages\Lang-en.txt | English language interface text file used by A2JViewer.swf |
| \a2j\Server\shared\Languages\Lang-es.txt | Spanish language interface text file used by A2JViewer.swf |
These files should be copied by the webmaster/system administrator to the web tree and modified to suit your situation. The steps are as follows...
- Download the package from here (.zip).
- Unzip the files into your web tree.
- Create a new directory under \a2j\Server\interviews for each interview. The name of the directory will become your interviewID inside of A2JViewer.php.
- Copy your A2J Author®-created interview files (with the .a2j extension) into the \a2j\Server\interviews\interviewID directories - one per directory. Rename the interviews to interview.xml (i.e. all of the interviews have the same file name, but they are in differently named directories under \a2j\Server\interviews.
- Modify \a2j\Server\shared\A2JViewer.php in the following ways...
-
- Change the <title> tag to something descriptive like the name of the Interview ...
<TITLE>Expungement of Past Criminal Record Interview </TITLE>
- Make sure the path in the javascript variables templateURL, fileDataURL, getDataURL, setDataURL and exitURL are correct with your setup.
- If you are not retrieving user data from your case management system or letting the user save partially incomplete interviews, then clear out the right side of the "=" in the lines for the getdataURL and other related variables as follows..
var getDataURL="";
var REGISTERED=0
var USER_NAME_FIRST=""
var USER_NAME_MIDDLE=""
var USER_NAME_LAST=""
- Put your website's home page into the exitURL variable as shown...
var exitURL= "http://www.yourwebsitehere.org";
- If you want the size of the A2J interview to be larger than 800 x 600, change the MovieSize variable. The code below will expand the interview window to fill the entire browser...
var MovieSize= "WIDTH=100% HEIGHT=100% hspace=0 vspace=0 align=top";
- For security purposes, you will want to the setDataURL to be accessible only via https protocol. This is because the interviews can contains user informationt that you will not want to send in clear text. For example the URL should like ...
var setDataURL="https://www.yourwebsite.org/a2/server/A2JSetData.php"
- Change the <title> tag to something descriptive like the name of the Interview ...
-
- Create or modify a webpage on your site with one link for each interview. For example, if you put your interviews into directories named "interview1", "interview2" and "interview3", you would have links inside this webpage that look like this...
<a href="\a2j\Server\shared\A2JViewer.php?interviewID=interview1">Here is the link to Interview 1</a>
<a href="\a2j\Server\shared\A2JViewer.php?interviewID=interview2">Here is the link to Interview 2</a>
<a href="\a2j\Server\shared\A2JViewer.php?interviewID=interview3">Here is the link to Interview 3</a>
- Modify \a2j\Server\A2JSetData.php to deal with the XML file that the user will be sending you. The data is accessible to you as an XML object and can be converted into a string or a file saved on the web server. The line ...
$results = $xslt->transformToURI($xmlobject, 'results.txt');
... will put the interview answers into a file called results.txt inside the \a2j\Server directory. You probably will want to put it somewhere else outside the publicly accessible web tree.
- That's it. I have probably made it look harder than it really is. If you have any questions, feel free to contact me at jmayer@cali.org.