
Nested Repeat Loops: A2J Author and HotDocs
This exercise will teach you how to create an A2J Guided Interview that can be parsed in HotDocs to replicate the nested repeat loop functionality that HotDocs supports.
A repeat loop is a series of questions that will display to the end user multiple times based on the user’s input. You use a repeat loop if the same type of information needs to be collected several times. A nested repeat loop is a repeat loop inside of a repeat loop.
Nested repeat loops are not natively supported by A2J Author. They require 2 digit variable indexing, which is not yet available in A2J Author. This workaround was designed by a developer in our community, Robert Aubin, that allows the author to set up 1 digit indexing variables that are then parsed in HotDocs.
This is some of the most complicated authoring that can be done in A2J Author. It is recommended that developers are comfortable in both A2J Author and HotDocs before they attempt this exercise. Before beginning this exercise, we recommend that you watch the August 2018 A2J Author New User Webinar which covered the basics of repeat loops and nested repeat loops. The video can be found here: https://www.youtube.com/watch?v=wLMlMK5Fx7Y&t=9s
This exercise will teach you how to create the simple nested repeat loop that collects the names of the user’s children and the cities they have lived in that was demonstrated in the YouTube video above.
The A2J Guided Interview Component
In this exercise, we’re going to replicate this interview.

-
Log into your www.a2jauthor.org account. If you aren’t sure how to create an account, check out this resource.
-
Once logged in, go to the “Author” tab and click it.
-
Then click “Run A2J Author”.
-
A2J Author will open on the “Interviews” Tab. Under “Create a new interview” double click on “Blank Interview”. This will open up a blank A2J Guided Interview.
-
Go to the “About” Tab and rename the title of the interview to Sample Exercise: Basic Nested Repeat Loops.
-
Go to the “Steps” tab. By default a blank A2J Guided Interview comes with 4 steps. You are going to want to delete 1 step so that there are 3 of them total. They should be named/numbered as follows:
-
-
Unlike most document assembly projects that use A2J Author as a front end interview for a HotDocs template, the HotDocs variables for the inner or child loops are not going to be used in the A2J Guided Interview. Instead, we will create distinct A2J Author variables and HotDocs variables for the inner loops. A HotDocs computation will parse and map the A2J Author variables to the corresponding HotDocs variables to simulate the two digit indexing in HotDocs.
-
Go to the “Variables” tab and create the following variables (the type of variable will be in parenthesis):
-
AbsoluteCount (number) (used as a unique index for each answer in the child/inner loops)
-
Add inside repeat TF (true/false)
-
Array size NU (number) (maximum number of answers in any child loop)
-
Child city TE (text)
-
Child name TE (text)
-
ICap NU (number) (check box that says “Check if multiple values”) (Total iterations in any give child loop)
-
-
InnerCount NU (number)(Tracks inside or child loop)
-
OuterCount NU (number) (Tracks outside or parent loop)
-
-
Now let’s start creating the questions we’ll build our interview out of. Go to the “Pages” Tab. By default, an A2J Guided Interview comes pre-populated with 4 questions - 3 in Step 0 and 1 in Step 1. Also, Steps only appear on the Pages Tab when they have questions inside them. So when you first go to the Pages Tab, all you’ll see is Step 0 and Step 1. As we add questions to the other Step, it’ll appear.
-
The first 3 questions that pre-populate an interview are 1-Introduction, 2-Name, and 3- Gender in Step 0. For this Sample Exercise, we can use those “as is”.
-
The only edit needed is to add three logic statements/conditions to the 3-Gender question. Double click it to open it and scroll down to the Advanced Logic section. In the “After” logic box type the following (exactly):
-


SET [Array size NU] TO 10
SET [InnerCount] TO 1
SET [OuterCount] TO 1
-
The above logic sets the maximum number of inner loop options to 10 (it doesn’t have to be 10, but it makes the parsing computation easier in HotDocs). This logic also initializes the count for the inner and outer loops.
-
The first question text edit is going to come to Step 1, question 1-Question 1. Double click on that question and rename it 1-Child outer loop.
-
The question text should be “Do you have any children?”
-
There should be two buttons.
-
Button 1: label - Yes (we’ll come back and add the destination question when we’ve created all of our questions).
-
Button 2: label - No
-
-
Create a new page by clicking the “New Page” button in the top navigation bar.
If the new page doesn’t appear immediately in Step 1, check Step 0. It will be created in Step 0 by default if your cursor isn’t clicked into Step 1.
-
Rename it 2-Child’s name and move it to Step 1 if it isn’t already in there.
-
The question text should be “What’s your %%ORDINAL(OuterCount)%% child’s name?” We’re using a macro and a function to call out the ordinal number of the outer loop’s counting variable. This will display “first”, “second”, “tenth” to the end user depending on what iteration of the outer loop they are in.
-
Scroll down to the Counting Variable field (right above the “Fields” section of the Question Design Window). Enter OuterCount as the Counting Variable. This tells A2J Author that this question is part of the outer repeat loop.
-
Create 1 field with the type Text, the label Name, and the variable Child name TE
-
In the Advanced Logic section we’re going to create two logic statements that will be used in the HotDocs parsing computation. .
-
BEFORE: SET [Add inside repeat TF] TO TRUE
-
AFTER: SET [AbsoluteCount] TO [OuterCount] * [Array size NU] + 1
-
-
This question will have 1 button that we’ll set once all the questions are created.
-
-
Create another new page. Double click on it to open the Question Design Window.
-
Rename it 3-Multiple cities? And move it to Step 1 if it’s not already in there.
-
Question text: Has %%[Child name TE#OuterCount]%% lived in multiple cities? (Scripting the question this way will tell A2J Author to insert the name of the child the end user just gave in the previous question.) This question is used to determine if the end user needs to enter the inner repeat loop - in this case, has their child lived in multiple cities.
-
Scroll down to the Counting Variable field (right above the “Fields” section of the Question Design Window). Enter OuterCount as the Counting Variable. This tells A2J Author that this question is part of the outer repeat loop.
-
This question should have two buttons.
-
Button 1: label - Yes, Variable name- A2J repeat trigger TF, default value - true, Destination to be set later.
-
Button 2: label - No, Destination to be set later.
-
-
-
Create a new page. Double click on it to open it.
-
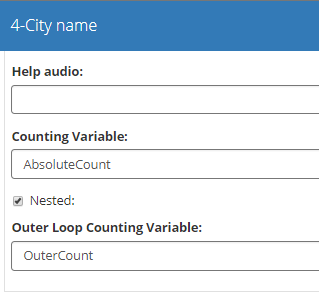
Rename it 4-City name and move it to Step 1 if it isn’t already there.
-
Question text: What is a city they lived in?
-
This is the 1st question of the inner/nested repeat loop. You need to tell A2J Author that this is part of the loop maintained by the counter AbsoluteCount and that it is inside or “nested” in the loop maintained by the counter OuterCount. To do this, scroll down to the Counting Variable field and insert AbsoluteCount as the Counting Variable. Then check the box next to “Nested”. Then type OuterCount into the new field that appears called Outer Loop Counting Variable.
-
-
Scroll down to the Fields section and create 1 new field. It should be type text. You don’t need a label because you’ve only asked the end user for 1 piece of information. The variable should be Child city TE.
-
On this question, you’ll also be allowing the end user to add another city to their child’s list or move on to information about another child. Create two buttons to do this.
-
Button 1: label - Add more cities, variable - Add inside repeat TF, default value - true, destination to be set later.
-
Button 2: label - Move on, variable - Add inside repeat TF, default value - false, destination to be set later.
-
-
This question also contains important logic that must be typed in exactly as shown in these instructions. The logic here is incrementing the InnerCount variable and the AbsoluteCount variable. It’s also setting the ICap NU variable to let the HotDocs computation know the maximum number of inner/child loops. Script the logic as follows:
IF [Add inside repeat TF#AbsoluteCount] = TRUE AND [InnerCount] <= [Array size NU]
SET [InnerCount] TO [AbsoluteCount] - ([Array size NU] *[OuterCount]) + 1
END IF
IF [Add inside repeat TF#AbsoluteCount] = TRUE AND [InnerCount] <=[Array size NU]
SET [AbsoluteCount] TO ([AbsoluteCount] = 1)
END IF
IF [Add inside repeat TF#AbsoluteCount] = TRUE AND [InnerCount]>[Array size NU]
SET [ICap NU#OuterCount] TO InnerCount
END IF
IF [Add inside repeat TF#AbsoluteCount] = FALSE
SET [ICap NU#OuterCount] TO InnerCount
END IF
-
The final question in Step 1 will ask the end user if they have more children to enter data about. Create a new page and double click to open it.
-
Make sure it’s in Step 1 and rename it 5-Add more children
-
Question text: Add another child?
-
Scroll down to the Counting Variable field and insert OuterCount
-
Make 2 buttons
-
Button 1, label - Yes, destination to be set later, Repeat options - Increment Counting Variable, Counting Variable - OuterCount
-
Button 2, label - No, destination to be set later, no other fields filled in.
-
-
-
The final question in this Sample Exercise is one to show your end user that they are out of the loops all together. Create a new page.
-
Put it in Step 2. The End. Rename it 1-Out of loops.
-
Question text: You are out of all the loops now. Save your answer file to test assemble with HotDocs.
-
1 button with a label of Finish and a destination of [Success - Process Form].
-
-
To complete this Sample A2J Guided Interview, we need to connect all the questions now. To connect questions, you set the Destination on each question to the next one in the line. Double click on each question in the following list and make sure it’s connected to the next question listed as follows:
-
1-Introduction connected to 2- Name
-
2-Name connected to 3-Gender
-
3-Gender connected to 1-Child outer loop
-
1-Child outer loop connected to 2-Child’s name
-
2-Child’s name connected to 3-Multiple cities?
-
3-Multiple cities? Connected to 4-City name
-
4-City name connected to 5-Add more children
-
5-Add more children connected to 1-Out of loops
-
-
Now that we have connected everything, we need to test our A2J Guided Interview.
-
Open 1-Introduction. Click Preview
and open the Variables/Script window
-
Go through your A2J Guided Interview and make sure that all of your variables populate and that your advanced logic works properly.
-
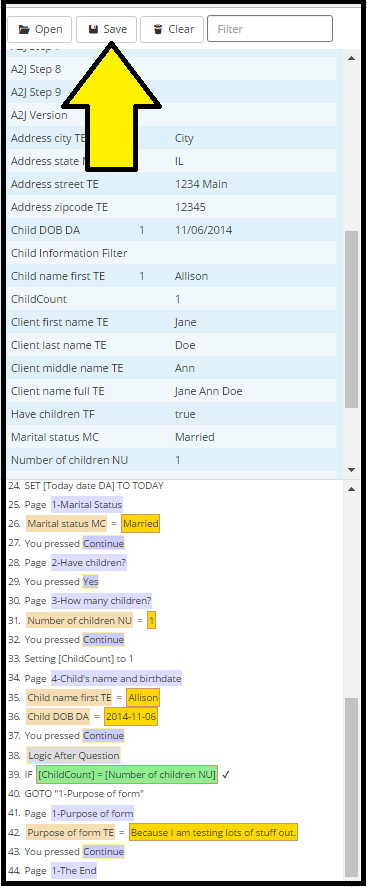
When you get to the end, go to the Variables Box and click “Save” (see figure 23). This will download your answer file. We will use that to test in HotDocs. We want to make sure our A2J Guided Interview and HotDocs template properly assemble together.
-
-


The HotDocs Component
Here is the full HotDocs RTF section that you’ll need to replicate. To practice in this Sample Exercise, create a new HotDocs Template from a blank Word document. You’ll need to create the following variables in your HotDocs Component File:
-
A2J repeat trigger TF (true/false)
-
Array size NU (number)
-
Child city TE (text)
-
Child name TE (text)
-
ChildCtr NU (number)
-
ExpIndex NU (number)
-
HD child city TE (text)
-
ICap NU (number)
-
InnerCount (number)
-
OuterCount (number)
-
ParentCtr NU (number)
The HotDocs portion should look like this:

This script first employs an IF statement that says IF the variable A2J repeat trigger TF is answered and it is true, then insert the Child loop variables parser CO (this is a computation that we’ll build next). Then in employs the outer loop which contains the variable Child name TE and the text “has lived in:”. That outer loop also contains the inner loop of the variable HD child city TE.
The most important part of the HotDocs side is the parsing computation. This is a computation variable called Child loop variables parser CO.
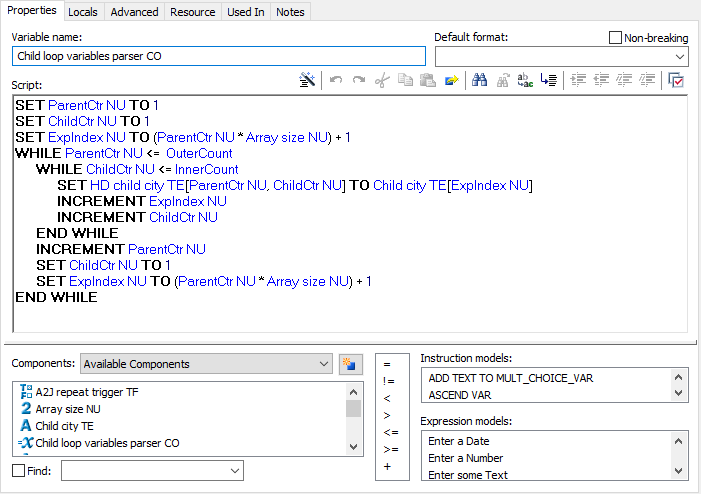
It parses the A2J Author inner repeat loop variable Child city TE which has the 1 digit indexing (ex Child city TE #12) into the HotDocs inner loop variable HD child city TE (1, 2) (1st outer loop value, 2nd inner loop value).
There are two repeat loops here.
Create Child or Inner Loop as a HotDocs Repeat Dialog:
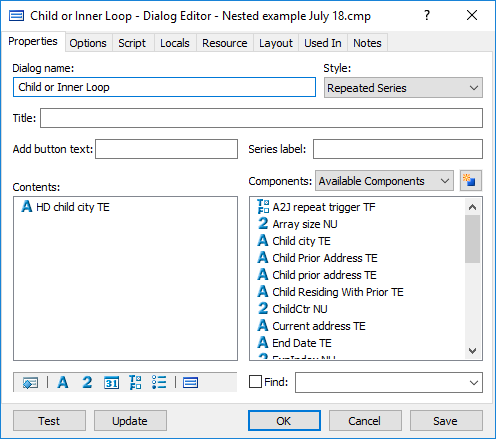
Create Parent or Outer Loop as a HotDocs Repeat Dialog:
(Make sure that the outer loop contains the inner loop dialog).

Once you’ve created the HotDocs Template, you need to test assemble your A2J Guided Interview with your HotDocs Template.
-
Now that we have connected everything, we need to test our A2J Guided Interview.
-
Open 1-Introduction. Click Preview
and open the Variables/Script window
-
Go through your A2J Guided Interview and make sure that all of your variables populate and that your advanced logic works properly.
-
When you get to the end, go to the Variables Box and click “Save” (see figure below). This will download your answer file. We are going to now use that to test in HotDocs.
-
-

-
Open up the HotDocs Automator and open your saved HotDocs template.
-
Click the Test Assemble button
in the top toolbar. This will open the Test Assemble window.
-

-
Click the Open Answers button in the Test Assemble toolbar. A new window will pop up.
-
Click the Add item button
. A dialog box will pop up.
-
In that box, there is a yellow folder icon. Click it. It will open up a search box for your local computer files. Navigate to where the .anx file (the answer file you created in A2J Author) was stored. (Check your downloads folder if you didn’t move it or save it some place else.) When you find the correct file, click “Ok,” and it will fill in the File name. Click “Ok.”
-
Your answer file should now appear in the list of answer files in HotDocs on the left side of the Open Answers dialog box. Double click on it. It will go back to the Test Assemble screen, and your answers should be populated in the interview. Your template should be filled out like this:
-
