
Sample Exercise: Adult Name Change
This exercise was designed to teach you the basics of automating a document in A2J Author, creating both an A2J Guided Interview and an A2J PDF Template.
Here’s the document we’re going to automate. You can find the PDF Document to start with here. Save a copy of this PDF to your local machine.

There are two components to a completely automated document - the A2J Guided Interview which interacts with the end user and asks them questions, and the A2J PDF Template, which creates the actual document for the end user.
A2J DAT PDF Template
We’ll first focus on the A2J DAT PDF Template, then move on to creating the A2J Guided Interview.
-
Log into your www.a2jauthor.org account. If you aren’t sure how to create an account, check out this resource.
-
Once logged in, go to the “Author” tab and click it.

-
Then click “Run A2J Author”.
-
A2J Author will open on the “Interviews” Tab. Under “Create a new interview” double click on “Blank Interview.” This will open up a blank A2J Guided Interview. To learn more about authoring in A2J Author 6.0, check out our Authoring Guide.
-
Go to the About tab and change the title of your interview to Sample Exercise: Adult Name Change. You can select any guide avatar options to customize the Guide avatar. You should also click over to the Author tab inside the About tab in order to add your information as the author of this interview.
-
Go to the Templates tab. Click the “Create PDF Template” button in the top right hand corner. It will take you into the PDF Template tool.
-
The PDF Template tool lets you automate on top of an existing PDF document and maintain the existing formatting of that PDF. When you open the PDF Template Tool it will look like this:
-
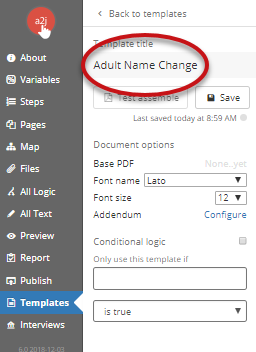
Name your template. In the “Untitled Template” field in the left editing panel, delete “Untitled Template” and type in “Adult Name Change”. Hit the Save button underneath it. Your template is automatically saved every 5 minutes, but it doesn’t hurt to hit the “Save” button every so often, particularly after making several changes. Your last saved information will appear underneath the save button. Template.
-
-
Now we need to add the underlying PDF to the PDF Template Tool. Click the “Upload PDF” button in the center of the blank editing field.
This will open your computer’s local file search tool.
-
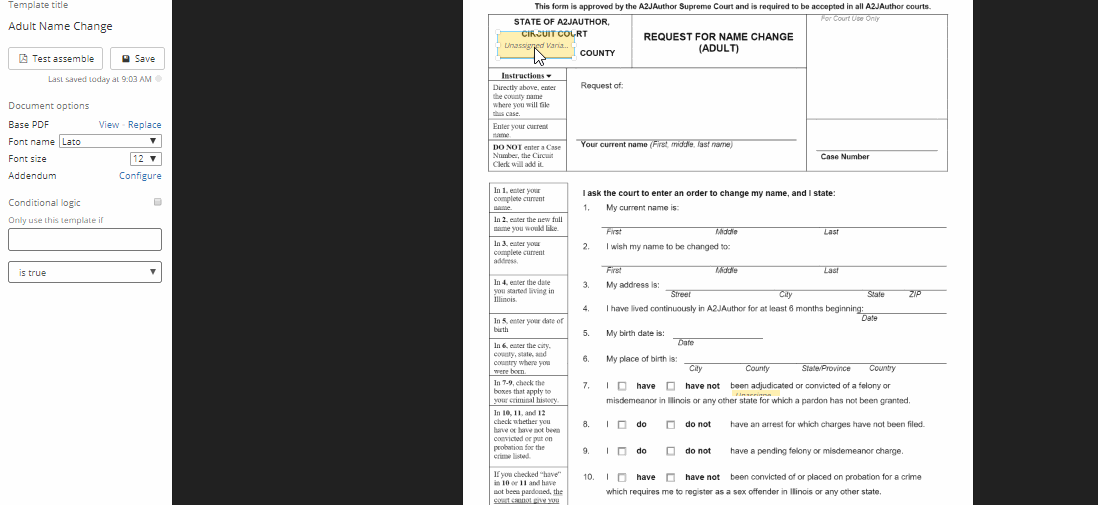
Navigate to where you saved the PDF that we’ll automate in this Sample Exercise. (It’s here if you need to download it.) Select that file and click “Open”. A2J Author will convert the PDF to a PDF Template. It should look like this:
-
Now we’re going to start automating the template by inserting variables in all the blank spaces. This is all the information that the end user will need to complete the sample exercise document. To insert a variable field (a blank space on the template that will contain a variable), double click on the blank line. The first one we’re going to do is “County” on the first line of the caption with the variable County MC. See the below gif.
-
If you need to adjust the size of the variable field, you can do so by dragging the corners of the field to make the box taller, shorter, wider, or narrower. You can also manually draw fields by holding down your left click button on your mousepad and dragging the cursor to draw the box. If you need to adjust the placement of the field, you can click on it and drag it.
-
To add a variable to the field that you just created, right click on the yellow “unassigned variable” variable field. An “Assign variable” editor will pop up. Type the name of the variable into the editor and select the variable type. If it is a repeating variable (*a type of variable meant to hold multiple values for a repeat loop) check the “Check if multiple values” box. You can also add comments about this variable that can only be seen by authors. The “Text grouping” “Text overflow” and “Addendum label” selections can be ignored unless you want to group multiple fields together (to be used for a series of checkboxes or multiline text).
-
Create a multiple choice type variable with the name: County MC (see the gif above)
-
-
Create fields and assign variables for the following:
-
User name first TE
-
Text type
-
Use this in the caption, in the line #1 for current name, and create a field underneath the signature line at the bottom of the page.
-
-
User name middle TE
-
Text type
-
Use this in the caption and in the line #1 for current name.
-
-
User name last TE
-
Text type
-
Use this in the caption, in the line #1 for current name, and create a field underneath the signature line at the bottom of the page.
-
-
User name first new TE
-
Text type
-
-
User name middle new TE
-
Text type
-
-
User name last new TE
-
Text type
-
-
Address street TE
-
Text type
-
-
Address city TE
-
Text type
-
-
Address state MC
-
Multiple choice
-
-
Address zipcode TE
-
Text type
-
-
Date began living in A2J DA
-
Date type
-
-
DOB DA
-
Date type
-
-
Birth city TE
-
Text type
-
-
Birth county TE
-
Text type
-
-
Birth state MC
-
Multiple choice
-
-
Birth country TE
-
Text type
-
-
Felony conviction TF
-
True/false
-
This true false variable will be used for both the “Have” and “Have Not” option for the “Adjudicated or convicted of a felony” question. When you insert the “Have Not” option, just check the “If the variable is false, draw the checkmark” option, like this:
-
-
Arrest no charges TF
-
True/false
-
Use same variable for “Do” and “Do Not” options. Check “If the variable is false, draw the checkmark” for the “Do Not” option.
-
-
Pending felony misdemeanor TF
-
True/false
-
Use same variable for “Do” and “Do Not” options. Check “If the variable is false, draw the checkmark” for the “Do Not” option.
-
-
Convicted sex offender TF
-
True/false
-
Use same variable for “Have” and “Have Not” options. Check “If the variable is false, draw the checkmark” for the “Do Not” option.
-
-
Identity theft TF
-
True/false
-
Use same variable for “Have” and “Have Not” options. Check “If the variable is false, draw the checkmark” for the “Do Not” option.
-
-
Felony probation TF
-
True/false
-
Use same variable for “Have” and “Have Not” options. Check “If the variable is false, draw the checkmark” for the “Do Not” option.
-
-


Your A2J PDF Template is now fully automated. It should look like this:

A2J Guided Interview
We are now going to create an A2J Guided Interview that will be paired with your A2J Template. For the purposes of this Sample Exercise, this form can only be used if the person has not been convicted of any crimes. Essentially they have to check “Do Not” or “Have Not” to all of the true/false questions.
-
A new A2J Guided Interview comes pre-populated with 4 questions. We’re going to have a total of 14 questions in this interview. Click the New Page button
at the top of the screen 10 times. Your screen should something look like this:
-
Now we’re going to create the Steps that will organize our questions. Go to the Steps Tab. By default, there are 4 steps in each A2J Guided Interview. Add 1 additional step and rename them as follows:
-
Step 0 : Introduction
-
Step 1: Your Information
-
Step 2: New Name
-
Step 3: Qualification Questions
-
Step 4: The End
-

It should look like this:

-
In an actual A2J Guided Interview, we recommend putting the qualification questions or any questions that may result in an end user being “kicked out” of the interview near the beginning. For the purposes of this Sample Exercise, we’ll explain in the introduction that this interview is only applicable to people who haven’t committed, been arrested for, or found guilty of any misdemeanors or felonies, so the qualification true/false questions can come in Step 3.
-
Go back to the Pages tab. Double click on 1-Introduction.
-
Question text: Welcome to the Adult Name Change A2J Guided Interview. This interview will walk you through all the questions necessary to fill out an adult name change in the state of A2JAuthor. This court form and therefore this interview can only be used if you have never been arrested or convicted of a misdemeanor or a felony. To get started, click "Continue." To exit, click "Exit".
-
Create two buttons.
-
Button 1- Label: Continue; destination will be set later.
-
Button 2 - Label: Exit; destination: [Exit - User does not qualify]
-
-
-
Double click on 2-Name. Change the Step to Step 1.Your Information. Change the question name to 1-Name, since it will be the first question in Step 1.
-
Question text: “Enter your current legal name.”
-
Scroll down to the Fields section.
-
Change the variable for the first name field to User name first TE
-
Change the variable for the middle name field to User name middle TE
-
Change the variable for the last name field to User name last TE.
-
-
-
We can use the default 3-Gender question as it is, except change the Step to Step 1. Your Information and change the question name to 2-Gender. This question will populate the end user’s avatar for them. It’s not required to fill out the form, but without asking this question, there won’t be an end user avatar in the interview.
-
Double click on one of the New Page questions you created above. Change the Step to 1.Your Information. Change the name to 3-Birthdate and birthplace.
-
Question text: What is your birthdate and where were you born?
-
Create 5 fields.
-
Field 1- Type: Date MM/DD/YYYY; Label: Birthdate; Variable: DOB DA; check the “Required” box.
-
Field 2- Type: Text; Label: Birth city; Variable: Birth city TE; check the “Required” box.
-
Field 3- Type: Text; Label: Birth county; Variable: Birth county TE; check the “Required” box.
-
Field 4- Type: Text (pick from list); Label: Birth state; Variable: Birth state MC; check the “Required” box. We’re going to use a list of the U.S. states that is already formatted to display the full state name to the end user, but save the 2 digit postal code in the answer file. You can download that XML list here. (If you’re working on this Sample Exercise outside the U.S. and create a similar XML list of states/provinces/territories in your country, we’d love to share it with the community. Please email it to our A2J Author Project Manager Jessica Frank at Jessica@cali.org)
-
Field 5- Type: Text (pick from list); Label: Birth country; Variable: Birth country TE; check the “Required” box. We’re going to limit this to the United States only for purposes of this Sample Exercise. You can change the country or create a more extensive list of countries if you’d like. In the Internal list field, type: United States of America
-
-
-
Double click on another new question page. Change the Step to Step 1.Your Information. Change the question name to 4-Address.
-
Question text: What is your current address? When did you start living in A2JAuthor. You need to have lived in A2JAuthor for 6 months continuously before filing this request.
-
Create 5 fields.
-
Field 1- Type: Text; Label: Street; Variable: Address street TE; Check the “Required” box.
-
Field 2- Type: Text; Label: City; Variable: Address city TE; Check the “Required” box
-
Field 3- Type: Text (pick from list); Label: State; Variable: Address state MC; Check the “Required” box. For the purposes of this Sample Exercise, the user has to live in the state of “A2JAuthor” in order to be under the court’s jurisdiction. So we’re only going to give the user 1 option to pick from. So in the Internal list field, add A2JAuthor.
-
Field 4 - Type: Number Zip Code; Label: Zipcode; Variable: Address zipcode TE; Check the “Required” box.
-
Field 5- Type: Date MM/DD/YYYY; Label: I began living in A2JAuthor; Variable: Date began living in A2J DA
-
-
-
Double click on 1-Question 1 in Step 1. Move it to Step 2. Rename it 1-New Name.
-
Question text: What do you want your new name to be?
-
Create 3 fields.
-
Field 1- Type: Text; Label: New first name; Variable: User name first new TE; Check the “Required” box.
-
Field 2- Type: Text; Label: New middle name; Variable: User name middle new TE; don’t check the “Required” box because not every has/wants a middle name.
-
Field 3- Type: Text; Label: New last name; Variable: User name last new TE; don’t check the “Required” box because a name change could be requested so the person has just a last name.
-
-
-
Double click on a new question page. Change the Step to Step 3.Qualification Questions. Change the name to 1-Felony.
-
Question text: Have you been adjudicated or convicted of a felony or misdemeanor in A2JAuthor or any other state for which a pardon has not been granted?
-
Create two buttons.
-
Button 1- Label: I have not; Variable: Felony conviction TF; Default value: false
-
Button 2- Label: I have; Variable: Felony conviction TF; Default value: true
-
-
If the end user answers “true” to any of the qualification questions they are going to be branched to a “Sorry, you don’t qualify” question. We’ll set the destinations in a later step.
-
-
Double click on a new question page. Change the Step to Step 3.Qualification Questions. Change the name to 2-Arrests.
-
Question text: Do you have an arrest for which charges have not been filed?
-
Create two buttons.
-
Button 1- Label: I do not; Variable: Arrest no charges TF; Default value: false
-
Button 2- Label: I do; Variable: Arrest no charges TF; Default value: true
-
-
-
Double click on a new question page. Change the Step to Step 3. Qualification Questions. Change the name to 3-Pending felony or misdemeanor.
-
Question text: Do you have a pending felony or misdemeanor charge?
-
Create two buttons.
-
Button 1- Label: I do not; Variable: Pending felony misdemeanor TF; Default value: false
-
Button 2- Label: I do; Variable: Pending felony misdemeanor; Default value: true
-
-
-
Double click on a new question page. Change the Step to Step 3. Qualification Questions. Change the name to 4-Sex Offender.
-
Question text: Have you been convicted of or placed on probation for a crime which requires you to register as a sex offender in A2JAuthor or any other state?
-
Create two buttons.
-
Button 1- Label: I have not; Variable: Convicted sex offender TF; Default value: false
-
Button 2 - Label: I have; Variable: Convicted sex offender TF; Default value: true
-
-
-
Double click on a new question page. Change the Step to Step 3. Qualification Questions. Change the name to 5-Identity theft.
-
Question text: Have you been convicted of or placed on probation for identity theft or aggravated identity theft in A2JAuthor or any other state?
-
Create two buttons.
-
Button 1- Label: I have not; Variable: Identity theft TF; Default value: false
-
Button 2 - Label: I have; Variable: Identity theft TF; Default value: true
-
-
-
Double click on a new question page. Change the Step to Step 3. Qualification Questions. Change the name to 6-Felony or probation.
-
Question text: Have you been convicted of or placed on probation for a felony in A2JAuthor or any other state?
-
Create two buttons.
-
Button 1- Label: I have not; Variable: Felony probation TF; Default value: false
-
Button 2 - Label: I have; Variable: Felony probation TF; Default value: true
-
-
-
Double click on a new question page. Change the Step to Step 4. The End. Change the name to 1-Sorry you don’t qualify. This question will be the “kick out” spot or final question for an end user who answered “true” to any of the qualification questions.
-
Question text: Unfortunately, based on your answer, you don’t qualify to use the Adult Name Change form in the state of A2J Author. If you made a mistake and would like to change your answer, click “Go Back”. If you would liked to exit this program, click “Exit”.
-
Create two buttons.
-
Button 1- Label: Go Back; Destination: [Back to prior question]. This will send the end user back to the question they were on before this question, whatever that question was.
-
Button 2- Label: Exit; Destination: [Exit - User does not qualify]. Once you select this destination, a new field for an exit URL will appear. Add a url to send your user back to your court or legal aid website or to an external resource. Enter www.a2jauthor.org in the URL field.
-
-
-
Double click on the second to last new page. Change the Step to Step 4. The End. Change the name to 2-County.
-
Question text: In what county will you be filing this request?
-
Create 1 field, Type: Text (pick from list); No label needed; Variable: County MC; Create the internal list of the counties in A2JAuthor
-
Alexander
-
Ayla
-
Cook
-
Franklin
-
Goshorn
-
Jestopia
-
Johnson
-
Kent
-
Mitchel
-
Stout
-
Toby
-
-
-
Double click on the final new page. Change the Step to Step 4. The End. Change the name to 3-The End
-
Question text: Congratulations! You’ve completed all the questions necessary to fill in the Adult Name Change form in the state of A2JAuthor. Click “Get My Document” to assemble your form. Make sure to print 3 copies. You will need to keep one for your records, submit one to the court when you file, and send one for a notice of publication for a name change.
-
The final button should have the label: Get My Document” and a destination of [Assemble - Generate PDF Document]
-
-
Now that we have created all of our questions, we need to connect them to one another.
-
Open up each question and go to the Buttons section. The questions should be connected through the Destination option as follows. Change any that are not connected this way.
-
1-Introduction (Continue button) to 1-Name
-
1-Introduction (Exit button) to [Exit - User does not qualify]
-
1-Name to 2-Gender
-
2-Gender to 3-Birthdate and birthplace
-
3-Birthdate and birthplace to 4-Address
-
4-Address to 1-New name
-
1-New name to 1-Felony
-
1-Felony (false value) to 2-Arrests
-
1-Felony (true value) to 1-Sorry you don’t qualify
-
2-Arrests (false value) to 3-Pending felony or misdemeanor
-
2-Arrests (true value) to 1-Sorry you don’t qualify
-
3-Pending felony or misdemeanor (false value) to 4-Sex offender
-
3-Pending felony or misdemeanor (true value) to 1-Sorry you don’t qualify
-
4-Sex offender (false value) to 5-Identity theft
-
4-Sec offender (true value) to 1-Sorry you don’t qualify
-
5-Identity theft (false value) to 6-Felony or probation
-
5-Identity theft (true value) to 1-Sorry you don’t qualify
-
6-Felony or probation (false value) to 2-County
-
6-Felony or probation (true value) to 1-Sorry you don’t qualify
-
2-County to 3-The End
-
3-The End to [Assembly - Generate PDF Document]
-
-
-
Now that we have connected everything, we need to test our complete A2J Guided Interview.
-
Open 1-Introduction. Click Preview
and open the Variables/Script window
-
Go through your A2J Guided Interview and make sure that all of your variables populate and that your advanced logic works properly.
-
When you get to the end, don’t click the “Get Document” button. When you’re in Preview Mode, A2J Templates don’t assemble. Go to the Variables Box and click “Save”. This will download your answer file.
-
-
-
Go to the Template Tab and click “Test Assemble” button
. It’ll prompt you to load the answer file that you saved in the step above. Once it’s loaded, click “Get PDF”.
-
Congratulations! You’ve successfully created your A2J Guided Interview and A2J DAT PDF Template. It should look like this when Test Assembled:

